To join me on a virtual sketching trip, download a travel sketch-journal here.
I add tutorials to them so you can learn the techniques and details you see in the sketchbooks.

My former workshop students asked me to upload my workshop workbooks to make them available to everyone. So you can also download a workbook and give yourself a workshop! Enjoy!


Tuesday, December 14, 2010

The Big Show/Sale, and Amazona Final Bits

I'm leaving on my Amazon trip in just a few hours, but I'm all ready to go so I have a few minutes to sit down and tell you what I added over the last few weeks whilst also preparing for my Big Studio Art Show and Sale. click on images to enlarge them

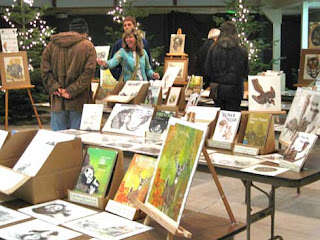
I'll get as far as I can before I have to get moving. First of all, the Art Sale was reasonably successful. I'll put in some pictures without much comment, and you can make of it what you will. Cathy and I traded sides this year, so I was to the right as people entered, instead of to the left.
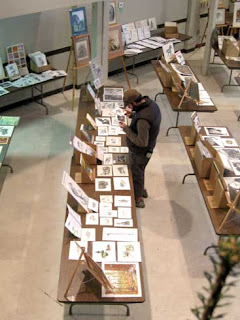
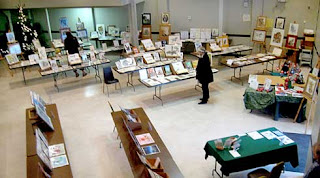
It looked pretty nice, in my opinion. The entire rear was lined with big noble fir trees Daniel and my hired hand Justin moved into the hall and placed judiciously. The guys helped me set up tables and assemble easels, and Cathy and her helper decorated them with white lights, which gave it a festive air. You can see glimpses of them in a couple of the photos.

I put my Christmas Tree ornaments on their manzanita "tree" at the entrance, where they welcomed people and proved a good conversation piece~ as I called my role of constructing them my "guilt-free TV watching entertainment," which seemed to amuse people.
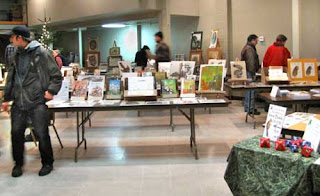
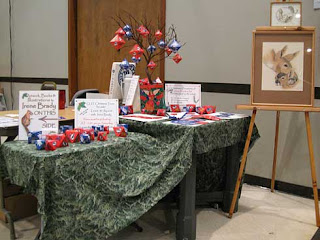
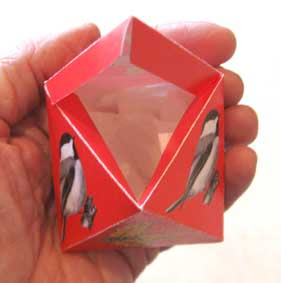
I'm getting hazy on this, but somebody somewhere had wondered if the ornaments couldn't be made to open so that people could put little gifts inside. Cathy noticed that you could glue all but one flap, which I'm showing here, put in a little something, then just press it shut. Cool!

Anyway, it took six hours to set the show up, a total of ten hours on our feet over the two days while the show was open, then about 2 hours to take it down. We made expenses and a bit over, but we've decided not to do it again next year. However, I do have an alternative up my sleeve, which I will tell you about when I get back.
It was really nice to see old friends, new friends, students, and people who've heard of me and wanted to meet me (well, I HAVE lived here for 30+ years). An old friend, Mark, came by and stayed to help disassemble the show ~ a wonderful help! By the time I finally got home, I collapsed in the chair and didn't move for a L.O.N.G. time. My feet still hurt, three days later!
But now that the show was out of the way (and believe it or not, I have completely put everything back in its place in the storage areas), I had a couple of days to UNpack all the cool stuff for my Amazon trip that I packed, what, a month ago? Then I added a few new things suggested by friends and people who have been a-travel and wanted to share. I think the entire carry-on ensemble is now up to 25lbs.
I had planned to attribute ideas to those who offered them, but it is after 8pm and I haven't had dinner yet. So I'm going to just offer these up with heartfelt thanks to those of you who suggested them.
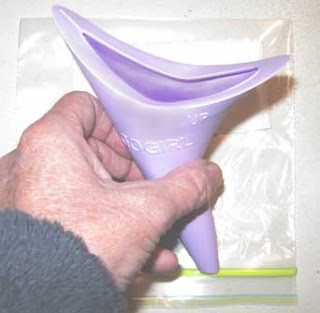
First of all, the Plastic Pee-er. That's not its name of course, and I'm not going to tout any one brand, but here's the one I finally got, for about $10.

I blushingly admit that I have tried it out, both in the bathroom and outside. It works beautifully, and doesn't get you wet, although it feels a bit scary the first time. If you're wearing levis or tightish pants, you have to pull them far enough down that the spout can point downish (doesn't have to be much more than half an inch of incline, though). But still, that means you'd probably moon somebody standing behind you. I haven't tried this, but I'll bet you could tie a shirt around your waist, knotting the sleeves in front so that the shirt-tail hangs down in back, and no one would realize what you were up to.

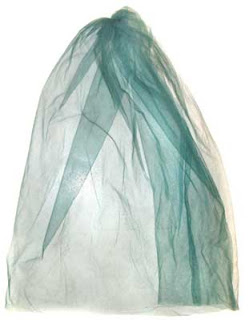
Okay, the next thing is a mosquito net. I made this from some dark tulle (stuff that tutus are made of, with a very fine mesh). It's just a piece about 18" long, gathered at the top, and sewed delicately down the side by hand. I can put it over my head and imagine mosquitoes vainly trying to get in. I can see through it almost perfectly, sort of a green mist between me and my subject, but it might mean the difference between being able to sketch or not. And it might be totally superfluous, but in any event it weighs virtually nothing and takes up about as much space as a cellphone in my bag.
And finally, I wasn't satisfied with my passport pouch. I found one that looks really nice and has two zippered pockets ~ one for the passport and vaccination booklet, the other for money or whatever. Here's the two of them together. I think the new one, on the left, won't be quite so tacky looking. Plus, it's easier to get at and won't need to be tucked in and out of my waistband.
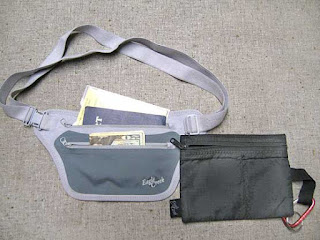
Today I got a hat, too, but I didn't get a chance to take a picture of it. It has a brim, and a skirt around the back to shade ears and neck, because malaria pills can make you sensitive to sunlight and you wouldn't want to mess around with that on your vacation.

So I'm ready to go. I finished decking out my sketchbook with paper ruler, a paper Centigrade/Fahrenheit thermometer converter, my business card. I then covered the entire back and front with clear package tape to ward off moisture and humidity, then taped in a plastic pocket to slip flat things into. I don't have a picture of that, either, but it's similar to ones I've done in previous sketchbooks, so if you have downloaded one of those you know what it looks like.

My plane leaves at 5am, which means I have to be there at 3am, but you can't ask a friend to take you to the airport at that ungodly hour when they have to work the next day, so I've arranged for Dan'l to deliver me to the airport at midnight and I'll settle down in a chair and nap. No biggie.

Thanks for sticking with me this far! See you in January!

Here's big hugs to all my friends, family and followers. I will think of you as I float down the Amazon, sweating, sunburned, happy as a clam. I hope.

Tuesday, December 7, 2010

Window Dressing for the Studio Sale

Okay! Got the window decorated! This year's Art Show & Studio Sale is now irrevocable.

Click on images to enlarge them.


The Shakespeare Festival Great Hall front window is all properly decked out with tasteful hanging posters, illustration/book-cover/book displays for three of my books, and several other things that look very nice. The bird mobile hangs in the middle this year, instead of at the end. Much better!

I plan to go see it after dark, because the lights in the window make things look really different (prettier, actually).

I've posted your invitation to the show above. That's me standing in front of the decorated window.

Last year it took about four hours of putzing around in the window to figure everything out and get the display set up. This year it took a bit over an hour ~ a tribute to experience and preparation.

As for the Studio Sale itself, last year I learned a little bit about what people are (and are not) interested in, which means I'm not taking some things I took last year, and have added the folded ornaments and better signage on the tables. For example, here's a sign to suggest what a nice gift a book/illustration combination would make.

Last year some of my best sellers were workbooks from my sketching, journaling and watercolor pencil classes. So this year I will have a whole table devoted to them. Below is the sign that will go on that table. There are all kinds of other signs encouraging people to leaf through the books to find where the original illustration in their hands appeared, informing them about copyright laws so they won't buy a picture and believe they have bought the copyright to it as well, and many other things.

I design those signs in InDesign, my desktop publishing program, then glue the paper printout to a piece of same-size Fomecore, which is a very light-weight sheet of foam layered between paper. I tape a triangular Fomecore piece to the back to prop the sign upright ON the table.

Then, after everything is tweaked and in its place, I TAPE the signs TO the tables. In fact, anything that can fall over gets taped to the tables because last year we had unruly kids (and one unruly dog) running into tables and knocking things over. This year there will be a sign at the entrance asking people to please leave their dogs outside. Wish we could ask people to leave all Unruly Beings outside.

Artists have a great advantage in selling their work, as we can make good signs, exactly the way we want them, instead of having to rely on others to do it for us. I feel really fortunate that I have Photoshop and InDesign programs (by now OLD, but still very functional) to help me produce the art and desktop publishing. However, one could also do quite a bit of this in other programs, as well. Word will let you do some fancy word processing ~ and some programs in The Cloud provide free access for tweaking images ~ Picasa, for example, lets you tweak your photos/artwork to some extent for free.

As soon as I finish here, I will be getting out my lists from last year to help me get everything for the show/sale ready to go and packed into boxes. Then the boxes will go out into the staging area (my living room, alas) so I can keep everything together until it goes out the door on Friday morning. I think I'm pretty much ready except for this final gathering-together.

You can probably tell I'm organizing my thoughts here, so this is as much for my benefit as for you to read. It always amazes me to discover which of my detailed blogs elicit interest!

This may be my last blog before the show on Friday and Saturday. After that, I'll come back online with a blog about last-minute additions to my 22lb carry-on luggage for my sketching trip to Costa Rica and the Amazon, which begins on the 15th of December (yeah, that's right, just 3 days after the Show & Studio Sale!).

I've gotten some wonderful tips from my readers about things I should take on my expedition, which I'll share with you. I've also created a little something to deal with mosquitoes. I may not need it, but it weighs less than an ounce or two, and if I DO need it, I'll be SO happy I brought it (I'll show it to you when I post).

Mo' laytah, dear friends!

Saturday, December 4, 2010

New Ornament Tree

After looking critically at the little Douglas fir tree I'd planned to use to display my ornaments (see at left), I went back out into the woods with my pruning shears and my saw, looking for a nice bushy manzanita branch. Click to enlarge images.

Here's what I returned with, and I must say, it looks a lot better than what it replaced (plus, I got a good dose of fresh air and sunshine)!

I had to lock JesseCat in the bathroom in order to decorate the little tree and take its picture, and only let him out when it was de-decorated. He is SO opinionated about where the ornaments should go (not on trees), and kept removing them with the wickedest of looks and skating them across the floor.... Here's what it looks like with the ornaments on it.

I think it will work okay. Maybe I'll put some flowerpot foil around the pot. I have the sand in it covered with lichens to improve its looks.

Just curious ... would YOU pay $1 for a little ornament and $1.50 for one of the bigger ones? How about 50¢ for an uncut sheet with one big one or two little ones on it? The ornament in the picture at right is the large size. Any suggestions?

I'm not even sure anyone will buy them. I may have to give them away with purchases. Well, at least they're colorful, and they're fun to make, so no big deal.

Friday, December 3, 2010

Window Dressing the ArtShow & Sale

It's time to do the window dressing for my Art Show and Studio Sale on December 10-11 and you are invited! I bought some underwriting on our local NPR station. The ad goes like this (although we're supposed to say "underwriting" not "ad":

  • Broadcast of this program is made possible in part by artist and illustrator, Irene Brady, and fine artists Cathy Egelston Mahoney and Belle Mahoney, joining our listeners in supporting JPR. These artists are presenting an Art Show and Studio Sale featuring hundreds of original childrens' book and nature magazine illustrations, drawings, watercolors, acrylic paintings, and prints on Friday, December 10, 4 to 8 pm and Saturday, December 11, eleven to five pm at the Shakespeare Festival Great Hall, 70 East Main Street, Ashland. Pre-views available at www.natureworkspress.com.

The FCC rules make it awkward ~ we wanted to say "You are invited to our Art Show..." but that's not allowed. And there can be no 'calls to action' such as "Come buy some art!" Ah well.

*********************************

The actual window dressing will happen on Monday, in three days, so I spent a large part of today making sure I had everything I need to make it look good.

Here's what it looked like last year, and while I don't plan to change it a lot, I will improve a few things. The important thing, Monday morning, will be to have everything all together and ready to go: the art, the easel and other props, the drape to cover the step-stool (which will hold pictures), the printed signs mounted on Fome-Core, a step-ladder to help hang things, and all the little bits and pieces, like scissors, tape, etc. It's ten miles to Ashland from my house, and I don't want to have to come back for something!

So this afternoon I was pre-assembling everything from scratch to make sure I had all the stuff to put each section together. Jesse, my mischievous cat, helped immensely with advice on placement (some of which he generously tweaked into better positions for me). You can see him proudly showing off his arrangement in the photo of Living Treasure artwork, above.

Last year, I climbed up into the display window with my heap of artwork and gear ~ and my mind went blank. So this year I'll take a printout of the picture of the entire window. For changes I made, I assembled them and took photos. I'll take the photos with me as reference.

It's also important to remember how I assembled these arrangements, so I took "behind the scene's" photos to remind myself how I set them up (see above right).

The step-stool supports my Redrock Canyon Explorer cover art and some inside art as shown here. The drape is a big velour bathtowel (it actually looks pretty good).

Last year I didn't have anything for sale for less than $5. With the economy so lax I thought it might be nice to provide some little hand-constructed ornaments this year for $1.50 or $2.00 each. So I created a couple of folded octahedron ornaments, one with a chickadee, one with a scampering chipmunk, and had my brother print them up for me. The last many nights I have sat folding and gluing as I watched TV, actually having a nice time with it....'simple minded' perhaps.....

But I won't get them all glued up, so I thought I might just sell the printed sheets for 50¢ each and let folks make their own if they want (see the printed sheets at right).

I'm not quite sure what to do about displaying them, so I thought maybe a twiggy branch might work.

It was pretty outside today, with a light layer of snow on the leaves, which looks very strange ~ I don't know why the oaks still have green/yellow leaves on the branches the first of December, but there you see it! And since it was nice outside I decided I'd better get out there and try to find a "tree" to hang the hand-made ornaments from.

Here's what I ended up with. It's still drying out by my wood stove, with some bonsai-type tying and tweaking to make it stand straight and persuade the branches to go where I want. I tied the twigs to a chopstick to guide them. This a pretty poor picture, so I should tell you it's a Douglas fir seedling (dead) with lots of lichens on it. I stuck it in a flowerpot with some wet sand, and I hope it will be dry by tomorrow morning.

But Jesse is such a pill that I don't dare hang the ornaments to try it out. I could tell you tales of trashed Christmas trees in years past, but it is way too depressing to contemplate. So I will secretly hang some tomorrow, briefly, then make my decision. Outside temperatures are supposed to be in the 50s this weekend, to I'll have another chance if this doesn't light up the cockles of my heart.

It is so hard for me to concentrate on this Art Show! I am really excited about it, but I am even more excited about my trip to Costa Rica and The Amazon, which will begin just a few days after the show. Still, one thing at a time...

I have located a marvelous house sitter, Marco, who will stay here the entire time I'm gone. I've had trouble getting/keeping housesitters because Jesse launches surprise sorties at their legs, so this time I'm putting Jesse in a kennel (his kennel room features a window with a bird feeder outside, and a separate playroom he gets to visit for an hour a day). And it's just as well, because Marco has a dog ~ looks sort of like a pit bull/lab cross to me ~ which he PROMISES me will not chew the furniture. I'm so pleased to have someone here to keep the house warm and pipes unfrozen! And he even knows how to use a woodstove. I am WAY lucky!

Here's Jesse, asking nicely for a tidbit ~ my live-in clown.

And with that, I'm back to Art Show preparations. Now that I've cleared the decks of the window dressing mess (it's all stacked in the livingroom, ready to go) I can start packing for the show itself. More later.

Monday, November 29, 2010

Fiddling Around at the Black Sheep

I took some time off yesterday, it being Sunday and all, to revisit the Black Sheep Pub. I hadn't sketched the Sunday Irish musicians, Irish Jam, there for nearly a year, and I had a sketchbook I needed to try out. This blog entry may interest you if you have trouble keeping yourself supplied with sketchbooks ~ they ain't cheap.

Because I'll be making a sketch/journaling journey next month, I wanted a small sketchbook that would fit easily into my pack and reduce the weight of my usual journal (a 6 x 9, Robert Bateman Series journal with smooth, heavy paper, which I love ~ but I'm trying to keep my carry-on weight down).

My brother David-the-printer suggested that we use the paper I had always printed my workshop workbooks on, 8½" x 11", cut in half, punched and coiled to make a 50-sheet journal. This would make the sketchbook half an inch shorter and narrower, 5½" x 8½" instead of 6"x9," and reduce the weight by a couple of ounces.

I wasn't sure the size was big enough, although I knew the paper was satisfactory for ballpoint pen and not-too-wet watercolor pencil application, so sketching at the Black Sheep would give me a clue as to whether this would work for my trip. Besides, I haven't sketched for awhile, and you really do get out of practice.

This group, or at least, as many of them as have the time and inclination, play at the Black Sheep Pub every Sunday from 3pm to about 5:30 or so. The light isn't great, and they're in a circle, which means that the nearer ones have their backs to you and the other side of the circle is further away than I like. But the music is grand, the instruments varied, and they don't mind being sketched at all.

If you'd like to hear what they're like click here (this isn't them, but the sound is very similar). There were about twelve of them there yesterday, and I managed to sketch only five of them since the pub was packed and I couldn't see all of them very well.

I started out with just ballpoint sketches. The first two or three were stiff and lifeless, and I didn't include them here. But then the music entered my pen, the Guinness Stout started to kick in, and I began to roll.

The musicians move around a lot as they play. And a number of these folk play numerous instruments, depending on their mood and the music being played. So there's not much chance to do a detailed study. The drawings have to be quick and sketchy, so you must throw caution to the wind and let fly. I did most of these in pen before I got out the pencils after a couple of hours with the ballpoint pen.

A rollicking group of eight dancers started an Irish set dance next to me and were stomping and clapping and whirling (often right into me) with great abandon. I could only laugh and stomp my feet in response. In fact, I was scribbling with the watercolor pencils and painting and stomping all at the same time, which kinda bent a couple of pages on the backside of the book. Ah weel!

Notice that the best sketches are the closest ones (and from the rear, because of that!). I don't know if everyone has the same response, but I've found that the closer I get to my subject, the better it turns out.

I only had six watercolor pencils with me, all shades of brown. This fits with the clothing they usually wear, the wood and leather instruments, and the dim recesses of the pub ~ besides, I wanted to try a limited palette.

These are shown roughly in the order in which I sketched them, and by the time I finished, with the sketch of the piper (below) from right behind him (I could have reached out and touched him as I sat) I was in rollicking form, scribbling wildly, smearing wetly with the brush, and singing along with the musicians (no, they didn't threaten to throw me out ~ the dancers were considerably wilder than I!).

In viewing the lot, I think I can safely say that the size of this sketchbook is usable although if weight weren't a consideration I think I'd go with my usual 6"x9" pad. The paper seemed to hold up well through my rowdy ministrations, and the surface didn't scrum up at all.

I didn't wet one of the sketches, the guitar player (second image down from the top). I loved the way the scribbled color looked, so I just left it. It will be okay as long as it doesn't get wet. I wonder if you could protect it with a fixatif (maybe on both sides of the paper!).

If you'd like to try making one of these sketchbooks, go to your local print shop and ask for Wausau Exact Vellum Bristol, 67lb, 92 Brightness, White, #82211, 8½ x 11. If they don't have it, they can probably order a package with little ado in their next paper order (print shops use lots of paper, and order often), then have them cut and punch it for you. Be sure to also have them cut and punch however many heavy cardboard backs and card stock fronts you need. To save money, you can assemble them and insert the coils yourself, putting as many sheets as you wish in each sketchbook. I put instructions for assembling these in the backs of all of my downloadable sketchjournals if you aren't sure how to proceed.

Hope you enjoyed this little trip to the pub. Be sure and listen to the irish music in the link above (or click here) . It REALLY sets the scene.

Monday, November 22, 2010

Make your Bandana Into a Sun Hat

Remembered bandana, forgot sunhat? Ooopsy!
A couple of days ago I mentioned in one of my travel packing posts that I had figured out a neat way to make a quick sunhat if you are caught out hiking (or whatever) without one and happen to have tied a bandana around your neck before starting out. Here is what it looks like.

It's really simple if you a) have a bandana, b) wear stud earrings or c) have a safety pin in your pocket (a cactus spine would work, too, if one just happens to present itself to hand).

1. Fold the bandana in half, cornerwise, and put it on your head with the point hanging down over your nose. Tie it behind your head at the nape of your neck. If you don't have a fastener, you can use it this way, although you will probably find the point hanging in front of your nose a tad annoying.

2. Remove the bandana from your head and fold up the point (both layers) about 1½" or, say, the width of a Snickers bar, or maybe the width of two fingers. You may fold up more or less as you please, since it's not crucial.

3. Remove a stud earring and poke it through the four layers to secure the flap. A light-weight earring won't drag the front edge down.

4. Tie the bandana back on.

5. Smile (optional).

I plan ahead and just keep an old earring poked into one corner of my bandana. (The one in the picture here is a little silver frog. I lost the other earring). When you roll the bandana for other purposes, it folds completely out of the way, though a nice-looking earring can be left to show as a decoration.

(Guys, maybe your wife or girlfriend will give you a spare. Or you could go shopping (pretend it's for a lady friend if you want). Or you might be happier with a safety pin, which you can just leave pinned to a corner of the bandana.)

You may choose to fold up the bandana point and fasten it before you tie the knot. Your choice.

A cactus spine could be used like the safety pin ~ minus the "safety" part {grin}.

This isn't haute couture, but it will keep the sun out of your eyes and protect your head from heat and solar UV. If you only want the shading effect over your eyes, roll the bandana into a band, tie it around your head like a sweat band, then untuck enough of the point to shade your eyes.

Oh yeah! I meant to show you how small my travel throw/blanket folds up, in order to tuck it neatly into the carry-on luggage. Here 'tis, snugged up with a velcroed band.

You can see I'm still in travel mode here. But I'd better get moving on preparing for the big Art Show and Studio Sale ~ it's coming up in about 3 weeks!

Hasta luego!

Friday, November 19, 2010

Sketchcrawl on a Wild Pacific Beach

Do you love to sketch/journal at the beach? I sure do! That's me below, sketching on the Oregon beach, at Whaleshead Cove.

I've uploaded a new sketch/journal from Oregon's wild Pacific beaches that I have just finished. You can download it here.

I added a tutorial, similar to the one in the one in my sketch-journal Oregon High Desert Crossing, to show how to tackle a project like this to get results you can savor for the rest of your life just by opening your journal.

I'm really pleased with this journal ~ it's the result of a sketchcrawl I did with a friend, each of us determined to sketch the full four days we had available.

And with the tutorial, you can come along with us as we employ all our skills to outdo each other. You'll laugh at some of my booboos, figure out how to get a beach "haystack" (that's a "haystack" in the opening picture above ~ the big island/rock in the water) to fit on your sketch page, walk alongside a scavenging crow, and practically get sand in your teeth as you grin in the salty wind along with us.

Sketchcrawl on a Wild Pacific Beach is full of great ideas and observations about getting the words and pictures down on the paper under sometimes trying circumstances (weather-wise) and spicing them up with native borders, fun fonts and design elements ~ plus a lot of other useful tips.

This was a super-fun sketch crawl, and the pleasure shines through in the sketches of these wild Oregon beaches and their colorful crabs, sea stars, mussels, chitons, sea gulls and other beachy creatures.

I hope you find it useful ~ and enjoyable!

Wednesday, November 17, 2010

Packing for a Jungle Sketching Trip #4

Finally, the last item on my packing list, the sketching kit, which as you recall, is in the medium sized bag in the picture at right, packed with all of my sketching gear. Its contents are listed here on a PDF.

This type of bag (below) is called a sling bag, and it fits nicely over the shoulder and across your back and chest, taking the weight off your arms and leaving your hands completely free. You can lob it around to the back if it gets in your way.

It's amazing how much stuff can be put in there without crowding or immobilizing the entire thing.

There are 3 pockets. The main large one (the top zipper), a smaller separate pocket (lower zipper) and a small velcroed pocket up on the strap that is intended for a cellphone. Since there is no point in carrying a cellphone in the jungle, this can be used for other important things.

The Large Pocket: I cut the sealing mechanism off the top of a large ziplock bag and lined this large pocket with the remainder of the bag (I couldn't cram it in with the ziplock part intact, but without it, it fits perfectly). This will keep things dry unless the bag "goes overboard." I put a layer of two folded plastic grocery bags in the bottom which pads the end of the sketchpad, and the entire bag can be popped into one of the grocery bags for protection if it's really wet. Here's what's in the big pocket:
  • The sitting pad of ¼" thick closed-cell foam (it keeps your bottom dry because it won't soak up water), is folded in half and fits upright in the back.
  • The sketchpad is next, coil edge up
  • a ballpoint pen with a clasp is inserted into the coil
  • The watercolor pencil pouch containing 36 watercolor pencils is actually short enough to fit sideways in the bag.
That's all I put in the large pocket, making it simple to get the main items in and out.


In the Cellphone Pocket are things I might want to trot out to use on a moment's notice:
  • my folded reading glasses in a little crocheted pouch (which I custom-made to fit and protect them)
  • my magnifying glass with a long, colorful string to make it hard to lose
  • half-a-dozen business cards
  • a small bottle of aspirin
  • several wrapped hard candies to keep my stomach happy when I need to concentrate. (oops! those didn't get in the picture!)

In the Lower Pocket are the rest of the items, helter-skelter, but the pocket is so small that everything is visible and accessible when the zipper is opened. It contains:
  • extra ballpoint pen/s
  • 2 or more waterbrushes ~ take two in case one fails. You might want a couple of sizes.
  • a couple of rags to wipe the ballpoint pen on (I often use the inside of my pants cuff or shoe), and to wipe up with the waterbrush which is used for wetting the watercolorpencil drawings.
  • a small closed-container pencil sharpener for the watercolor pencils. A closed container is essential, since bits of watercolor pencil will stain magnificently if they get wet (which they almost certainly would).
  • a mechanical pencil loaded with #2 leads
  • a kneaded eraser
  • clear tape ~ make a plastic guard to keep it from getting trashed in the pocket
  • a small bottle of glue ~ this might have to be put in the liquids bag if noticed.
  • blunt scissors ~ sharp ones won't make it through the check-in line.
  • a dispenser of plastic toothpicks. These are sold in drugstores, and are useful for lots of things. Especially if you forget to brush your teeth.
Inside the cover of the Sketchpad I have glued a photocopy of a ruler so I can measure things I sketch and a business card in case I lose the sketchbook (heaven forbid!). A plastic pocket is taped in, with the open side toward the coil, so I can tuck things in that I might want to glue in later and they won't fall out.

Although I don't show it or list it in my packing list, it occurred to me that I should attach my tiny key ring thermometer to my sling bag so I will know the temperature. In Peru they measure the temperature in Celsius units, so I've glued in a Celsius/Fahrenheit converter just for the heck of it.

On the front of the journal is a map which shows both the Osa Peninsula in Costa Rica where I'll be going first, then the Upper Reaches of the Amazon in Darkest Peru where I'll be staying for the rest of the time. I plan to glue in a closer view when I get to the right point in my journal, so I'll tuck that map into the sketchbook for later.

I do almost all of my drawing with ballpoint pens. Pencils are useless in the moist tropics because they don't mark well unless you really press hard, then they indent the paper so that you can't make corrections. Even if you press hard, the line doesn't register well, so since you can't redo it anyway, you might as well use a ballpoint. If you pick a good one that doesn't blob, it makes a wonderful drawing tool. I use an ordinary medium point Bic pen, costing less than a dollar. Works great. Here's a picture of me sketching a sea turtle on one of my sketching trips, just to keep in focus what this is all about (grin).

I used to teach a workshop on Sketch Journaling. If you want more information like that, you might want to download Nature & Travel Sketch Journaling for more details.

So there it is. Now that I have all this out of the way, everything packed and ready to go a full month ahead of time and the housesitter arranged for, I can start preparing for my Second Annual Art Show and Studio Sale, which will be in Ashland, Oregon, at the Shakespeare Great Hall on Main Street (just below the Shakespeare Theater) on Friday, December 10 (4-8pm) and Saturday, December 11 (11am to 5pm). You're invited! Here's what it looked like last year.

Guess I'd better get started! Hope you enjoyed this little exercise in packing. I sure did. Thanks for stopping by.

Here's a grab-bag of other entries...

Related Posts with Thumbnails