If you were keeping track, last week you'll recall that I had a really spiff slideshow up on my blog, and was trying to figure out how to move it to the right panel as a permanent display. I made the slideshow at Slide.com, and I had read their permissions and conditions more carefully than I usually do, but was still caught by surprise when I clicked on one of my images to enlarge it and encountered this invitation: "Grab the code below to add this picture to any web site, like Craigslist, Myspace, Xanga or your blog!," it said.
I don't want to seem naive here. I KNOW you can right-click on most pictures (ones which haven't been purposely protected from that) to copy and snitch them. I've borrowed a few myself to use temporarily as resource materials when creating an illustration. I've never copied someone else's work or photo straight across, of course, because that's an infringement of their copyright, but I have referred to a borrowed photo to get anatomy or color correct on a piece I was creating.
Actually, I would expect an occasional lift/borrow of a photo of mine. But to see an INVITATION to take it really threw me. It seemed to be a message to any viewer from ME saying I WANTED people to take the pictures, which is not my intention at all since my only purpose was to use the slideshow as a gallery to show potential clients my style and scope.
So I took it down. If anyone who reads this can guide me to the part of the Slide.com agreement that states they plan to do that, I'd really like to read it. I don't have time to plow through that lengthy agreement again just now, but I sure wonder if I missed a paragraph or something -- or if they just do it "because they can."
Nuff ranting, I suppose.
I just finished a two session workshop on nature journaling this afternoon, and I'll be posting the blog about the class (great fun!) within the week, I expect. They produced some really excellent work.
Sunday, February 22, 2009
Tuesday, February 17, 2009
Birds at Redstone Arsenal, Huntsville, Alabama
[The slide show has been removed. I left up the original posting with explanatory notes in red. Here's the original posting:]
I'm experimenting with a widget. Below, in the slideshow, are some illustrations I created for a birding trail at the Redstone Arsenal in Huntsville, Alabama. I just discovered if you run your cursor over the picture it comes into focus better and the title I typed in for it pops up! WoW!
Sorry -- I took the slideshow down.
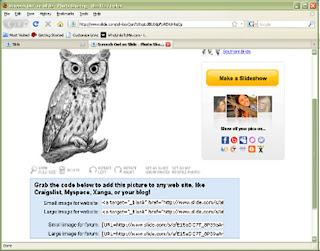
Why? Click on the graphic to get a bigger view. It's kind of fuzzy since it's just a printscreen shot, but I think you can read it.
I discovered late last night when I clicked on my slide show image to get a larger view of the screech owl, that Slide.com ENCOURAGES people to grab your pictures and use them any way they want. When you click on the image of the PrintScreen here ~ be sure to read the print in the blue box!
They were begun in pencil then manipulated in Photoshop. Actually, after many hours of experimenting, some of the later ones were done entirely in Photoshop, from the rough sketch to the finish, using a Wacom tablet and stylus.
If you watch the slide show for a moment, you'll see a grouping of birds, then closeups of the birds shown in the group. They manufactured then positioned etched aluminum signs of the groupings at key points along the trail (at the edge of an open meadow, inside the forest, etc., where people might expect to see those birds. The trail is solely for the pleasure of the people living on the base, because it isn't open to the public. I'VE never even walked the trail!
I'm pretty pleased with these. I'm going to see if I can transfer this slideshow over to the right side of the page so it doesn't scroll down and off. WELL, MAYBE NOT!!!! But I haven't figured out how to do that yet.....
Sorry about this -- but maybe we can all learn a lesson.
That bit of information ~ that they'd suggest photo "sharing" ~ was not obvious in the Slide.com agreement (if it was there at all), which I DID read fairly carefully (more carefully than most, I suspect). I certainly didn't see a note mentioning that they would suggest, encourage ~ and actively enable ~ people to lift your pictures!
And my education continues....
I'm experimenting with a widget. Below, in the slideshow, are some illustrations I created for a birding trail at the Redstone Arsenal in Huntsville, Alabama. I just discovered if you run your cursor over the picture it comes into focus better and the title I typed in for it pops up! WoW!

Sorry -- I took the slideshow down.
Why? Click on the graphic to get a bigger view. It's kind of fuzzy since it's just a printscreen shot, but I think you can read it.
I discovered late last night when I clicked on my slide show image to get a larger view of the screech owl, that Slide.com ENCOURAGES people to grab your pictures and use them any way they want. When you click on the image of the PrintScreen here ~ be sure to read the print in the blue box!
They were begun in pencil then manipulated in Photoshop. Actually, after many hours of experimenting, some of the later ones were done entirely in Photoshop, from the rough sketch to the finish, using a Wacom tablet and stylus.
If you watch the slide show for a moment, you'll see a grouping of birds, then closeups of the birds shown in the group. They manufactured then positioned etched aluminum signs of the groupings at key points along the trail (at the edge of an open meadow, inside the forest, etc., where people might expect to see those birds. The trail is solely for the pleasure of the people living on the base, because it isn't open to the public. I'VE never even walked the trail!
I'm pretty pleased with these. I'm going to see if I can transfer this slideshow over to the right side of the page so it doesn't scroll down and off. WELL, MAYBE NOT!!!! But I haven't figured out how to do that yet.....
Sorry about this -- but maybe we can all learn a lesson.
That bit of information ~ that they'd suggest photo "sharing" ~ was not obvious in the Slide.com agreement (if it was there at all), which I DID read fairly carefully (more carefully than most, I suspect). I certainly didn't see a note mentioning that they would suggest, encourage ~ and actively enable ~ people to lift your pictures!
And my education continues....
Sunday, February 1, 2009
Intermediate Nature Sketching
I've been giving workshops long enough now that I'm starting to get continuing students from previous classes. The Intermediate Nature Sketching class last Sunday was a good example, with three students from previous classes and one new student. There was a real anomaly as well ~ three lefties in the class and only ONE right-handed student! (BTW, the lefties were all returners. Does that mean anything? Naw! Surely not!). There they are in the class photo above, all busily left- and right-handing!
It really made me think about how I design my workbooks, because being right handed I have somewhat heedlessly set up the books to be used by right-handers when, with a bit of planning and forethought I can make them equally well-designed for either-handers by, for instance, putting examples ABOVE the area to be drawn in (instead of BESIDE, where they may be covered by a drawing hand)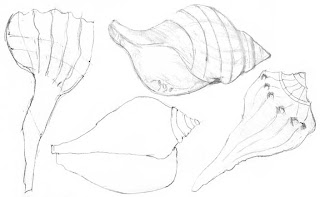 and placing the drawing area in such a way that neither right- nor left-handers have to draw with their hand resting on the plastic comb spine (not really comfortable). It took awhile for that to sink in, but I paid especial attention to it in the upcoming new Nature Sketching With Color workbooks for next weekend. They're not perfect yet, but they are considerably better.
DAY 1
The workshop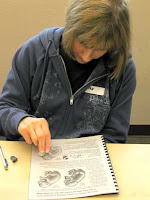 went pretty smoothly considering it was a first run for a couple of things. We warmed up by drawing shells, and since this is an intermediate class I had the students working to use the arc of their hand, and paying particular attention to details of proportion. They did well, as shown in the collection of their shell-drawing efforts above.
This class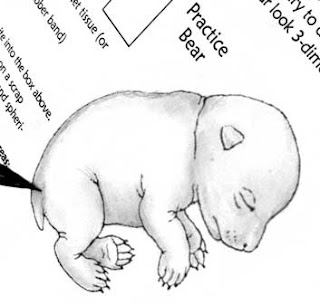 teaches a collection of techniques: how to deal with 3-D shading with regard to cylinders, spheres and planes; seeing and utilizing negative space; a basis for creating realistic leaves, drawing believable eye, and any number of other things.
The workbooks are invaluable for this, as they provide the students with outlines within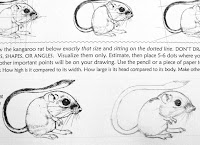 which to work on specific skills. Sure, the students could draw the outlines to work inside, but that would take up a large percentage of the time allotted for the exercise, and they wouldn't learn nearly as much.
 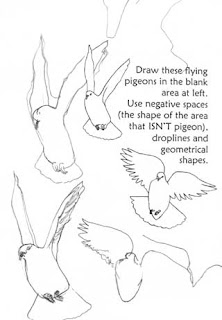 I've never gotten any complaints from students about having to work inside these outlines, so I think they are filling their purpose well.
After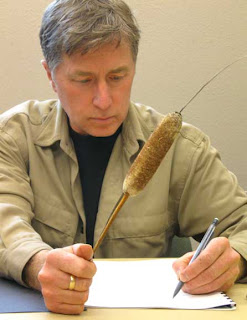 lunch I pulled out my piece d' resistance, the box of cattails which I had so carefully labored to keep from exploding a few weeks ago (see previous post). They made the trip well, and, in fact, survived being taken home and returning with the students without showing any signs of wear.
The cattail project page in the workbook is very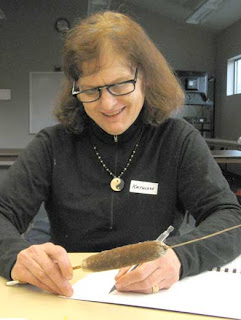 detailed because the students take the cattail home to work on overnight (sometimes they don't have time for homework, but if they do it is much more rewarding and they learn a great deal by trying to puzzle things out for themselves).
We worked on the cattails an hour in class ~ I did a drawing right alongside them so that I could show them ways to work on the texture and shading.
Part of the homework assignment was to add some fluff to the cattail in the drawing, using a reference photo in the workbook of a partially exploded cattail.
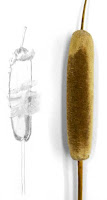
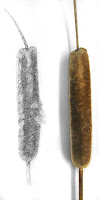
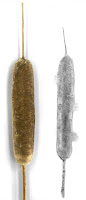
 An exploding cattail picture is more visually interesting, and I wanted them to get some practice combining photo-reference material with a sketch. Be sure to click on the images to see a larger version of how they worked out the problem. In order at left are:
 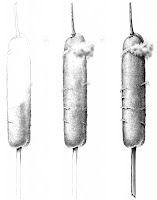 Jan's, Lynns, Kathleen's and Randy's cattails. Nice, huh?
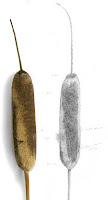
That evening, I finished my cattail, too, scanning it into Photoshop during the process, then taking the series to class the next morning so the students could see how I worked out the problems. That's the 3-step series at right.
DAY 2
We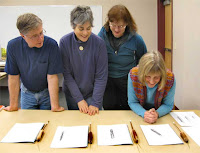 critiqued the cattails as soon as everyone had arrived the next morning, discussing the problems they ran into with the fluff. (I had let them deal with that without much instruction in the workbook. Some of my most useful learning sessions have been when I had to piece together how someone else got a certain effect.)
The second day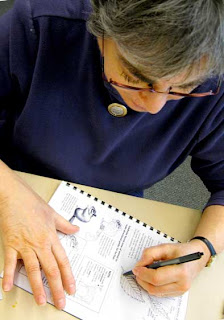 was spent learning how to draw realistic fur on animals, practicing quick ways to rough in a drawing by drawing PAST it then filling in the inner parts
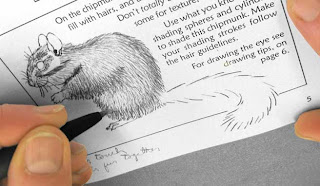 , putting highlights and bounce reflections on eyes and considering how the eye highlights relate to highlights and shadows on spheres, etc.
I had them drawing mostly with ballpoint pen ~ this is useful in forestalling the "sketchy" drawer. Since the lines can't be erased, they don't get made in the first place, leading to a much more "conscious" drawing. And when you're super-conscious of each line you draw, you learn a lot faster.
Because the ballpoint can produce a whole range of tonal values from light gray to black black, it has many of the same drawing qualities as a pencil. After the initial OMG reaction, students often quickly come to prefer it over pencil for sketching (I sure do!). In fact, in the evaluations at the end of the class, Lynn, in response to "What is your favorite medium?" wrote: "pencil, now converting to ballpoint pen!"
After lunch, for our final project, I got out my special effects kit and taught the students how to create white hairs and whiskers against black, then we did the mushroom shown here. They were SO pleased with the results, and so am I.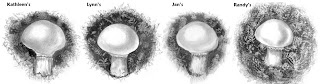 One student declared that she's going to do this as a project with her grandson when he comes to visit. Sounds to me like the perfect fun thing for him to do with Granny.
So there is is. A very satisfying workshop for me, and I think for the students, too.
Next weekend
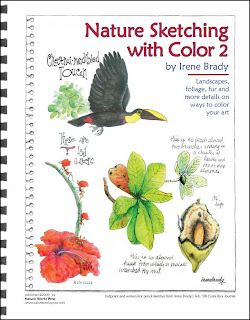 is my Nature Sketching with Color class. I finished the two workbooks just last week and sent them to bro David, who has already printed and FedExed them back. They should arrive on Monday or Tuesday with enough time for me to write up the detailed class plan schedules I work from.
I've tried classes both loosely and tightly structured, and when they're loosely structured the students sometimes don't get a chance to try a technique because we've dallied too long on a previous one.
So I try to keep things moving right along by using the schedule ~ I always know about where in the curriculum I am supposed to be. That's my left brain talking, I guess!
Till next time!
 long enough now that I'm starting to get continuing students from previous classes. The Intermediate Nature Sketching class last Sunday was a good example, with three students from previous classes and one new student. There was a real anomaly as well ~ three lefties in the class and only ONE right-handed student! (BTW, the lefties were all returners. Does that mean anything? Naw! Surely not!). There they are in the class photo above, all busily left- and right-handing!
It really made me think about how I design my workbooks, because being right handed I have somewhat heedlessly set up the books to be used by right-handers when, with a bit of planning and forethought I can make them equally well-designed for either-handers by, for instance, putting examples ABOVE the area to be drawn in (instead of BESIDE, where they may be covered by a drawing hand)
 and placing the drawing area in such a way that neither right- nor left-handers have to draw with their hand resting on the plastic comb spine (not really comfortable). It took awhile for that to sink in, but I paid especial attention to it in the upcoming new Nature Sketching With Color workbooks for next weekend. They're not perfect yet, but they are considerably better.
DAY 1
The workshop
 went pretty smoothly considering it was a first run for a couple of things. We warmed up by drawing shells, and since this is an intermediate class I had the students working to use the arc of their hand, and paying particular attention to details of proportion. They did well, as shown in the collection of their shell-drawing efforts above.
This class
 teaches a collection of techniques: how to deal with 3-D shading with regard to cylinders, spheres and planes; seeing and utilizing negative space; a basis for creating realistic leaves, drawing believable eye, and any number of other things.
The workbooks are invaluable for this, as they provide the students with outlines within
 which to work on specific skills. Sure, the students could draw the outlines to work inside, but that would take up a large percentage of the time allotted for the exercise, and they wouldn't learn nearly as much.
  I've never gotten any complaints from students about having to work inside these outlines, so I think they are filling their purpose well.
After
 lunch I pulled out my piece d' resistance, the box of cattails which I had so carefully labored to keep from exploding a few weeks ago (see previous post). They made the trip well, and, in fact, survived being taken home and returning with the students without showing any signs of wear.
The cattail project page in the workbook is very
 detailed because the students take the cattail home to work on overnight (sometimes they don't have time for homework, but if they do it is much more rewarding and they learn a great deal by trying to puzzle things out for themselves).
We worked on the cattails an hour in class ~ I did a drawing right alongside them so that I could show them ways to work on the texture and shading.
Part of the homework assignment was to add some fluff to the cattail in the drawing, using a reference photo in the workbook of a partially exploded cattail.


 An exploding cattail picture is more visually interesting, and I wanted them to get some practice combining photo-reference material with a sketch. Be sure to click on the images to see a larger version of how they worked out the problem. In order at left are:
  Jan's, Lynns, Kathleen's and Randy's cattails. Nice, huh?
That evening, I finished my cattail, too, scanning it into Photoshop during the process, then taking the series to class the next morning so the students could see how I worked out the problems. That's the 3-step series at right.
DAY 2
We
 critiqued the cattails as soon as everyone had arrived the next morning, discussing the problems they ran into with the fluff. (I had let them deal with that without much instruction in the workbook. Some of my most useful learning sessions have been when I had to piece together how someone else got a certain effect.)
The second day
 was spent learning how to draw realistic fur on animals, practicing quick ways to rough in a drawing by drawing PAST it then filling in the inner parts
 , putting highlights and bounce reflections on eyes and considering how the eye highlights relate to highlights and shadows on spheres, etc.
I had them drawing mostly with ballpoint pen ~ this is useful in forestalling the "sketchy" drawer. Since the lines can't be erased, they don't get made in the first place, leading to a much more "conscious" drawing. And when you're super-conscious of each line you draw, you learn a lot faster.
Because the ballpoint can produce a whole range of tonal values from light gray to black black, it has many of the same drawing qualities as a pencil. After the initial OMG reaction, students often quickly come to prefer it over pencil for sketching (I sure do!). In fact, in the evaluations at the end of the class, Lynn, in response to "What is your favorite medium?" wrote: "pencil, now converting to ballpoint pen!"
After lunch, for our final project, I got out my special effects kit and taught the students how to create white hairs and whiskers against black, then we did the mushroom shown here. They were SO pleased with the results, and so am I.
 One student declared that she's going to do this as a project with her grandson when he comes to visit. Sounds to me like the perfect fun thing for him to do with Granny.
So there is is. A very satisfying workshop for me, and I think for the students, too.
Next weekend

 is my Nature Sketching with Color class. I finished the two workbooks just last week and sent them to bro David, who has already printed and FedExed them back. They should arrive on Monday or Tuesday with enough time for me to write up the detailed class plan schedules I work from.
I've tried classes both loosely and tightly structured, and when they're loosely structured the students sometimes don't get a chance to try a technique because we've dallied too long on a previous one.
So I try to keep things moving right along by using the schedule ~ I always know about where in the curriculum I am supposed to be. That's my left brain talking, I guess!
Till next time!
Subscribe to:
Posts (Atom)
Here's a grab-bag of other entries...
