To join me on a virtual sketching trip, download a travel sketch-journal here.
I add tutorials to them so you can learn the techniques and details you see in the sketchbooks.

My former workshop students asked me to upload my workshop workbooks to make them available to everyone. So you can also download a workbook and give yourself a workshop! Enjoy!


Showing posts with label Sketch Journaling. Show all posts

Friday, December 8, 2017

Adding Color to the Wasps! I DID IT!

I am now officially past my "artist's block," 
thanks to you. 
I expect to be adding more entries from time to time, so if you want to know about it, put your email over there in that box to the right so you will be notified. Just in case you didn't do it before, you may have missed the second entry I made, a couple of weeks ago (this is the third one).  If so, just scroll down.

Here's the wasp drawing with color added.  It's a lot easier to understand what's happening, isn't it?


Check below in the previous entry to see what this drawing looked like before color was added.  I also wrote in that entry about how I painted the mural on my house walls -- lots of pictures.
Macal in May. Now it's 8' tall.
That's Nacho's thatched hut where
he stays when we go out to El Rancho.

Stay tuned. I'll be adding color to the cecropia drawing (my first one), and also to a drawing I just finished this week out at Micasa, my little house in the jungle at El Rancho.  I finally was able to get there after seven weeks of the road resembling a turtle pond (complete with turtles) and pretty much impassable. When at last I arrived, I fulfilled my vow to make at least one sketch during each visit. (Hint: this latest one is a fungus).  

And they're improving the road -- there's a crop of macal out there that's due to be harvested in January!  

Hasta mas tarde!  

Saturday, November 25, 2017

Mural Painting Tutorial (and Sketch #2)

Onward with my quest to restart my sketch journaling while balanced daintily on a 6’ ladder. 

Where am I on my journey to Restart My Journaling? Well....I have actually gotten out my watercolor pencil box. It is lying on the desk. 

A ladder got me really close
nice, calm wasps
I have not opened it yet, but I will, because this sketch is a little confusing in black and white.

But color will improve it, and what better way to jog my hand to apply the color than to tell you about my intentions? 

I’ll scan in the colored drawing when I get it done.  Hold my feet to the fire, my friends!!!!!

+++++++++++++++++++++++++++++++++++++++++

a panorama photo of my house mural about half-way
done,
before the house was re-painted cream.
Okay, now, I promised in my November 11 blog that I would do  step-by-step tutorial on how I painted the murals on my house walls. 
If you aren’t into details, this one may be a bit “much" and you can stop here. But if you’ve ever wondered how the heck one gets that art from a  sketchpad up onto the wall, read on.
  
I’d gotten a little experience at mural painting on the walls of the North Mountain Park Nature Center in Ashland, Oregon a few years back, so I was intrigued by the invitingly blank walls of my new Belize house. 

a Mayan ball player
My earthbag house, which I have cunningly named Casa de la Tierra (House of Earth)  is actually built on an old Mayan terrace, next to a completely buried (it is said) Mayan temple ruin, so obviously the most appropriate decorations would be Mayan in nature. I wanted them to look authentic, so I nosed around on the internet to see if I could find some good subjects. 
 

Chilam Balam texts of Chumayel
My research turned up ancient figurines, hieroglyphs, wall paintings bas-reliefs carved into stone stelae (like this one of Lady Wac-chanil-ahau standing atop a bound captive warrior), plus painted or inked codices – bark-paper books the Mayans created around the 1100s. Some were pretty gruesome, so I avoided those. Others, like this winsome little jaguar tickled my funny-bone.

With lots of subjects to choose from, I picked out several for my mural, looking for drama and detail and avoiding modern interpretations (as far as I could tell) with which the internet is flooded. I decided to copy them almost exactly to keep them authentic-looking.   
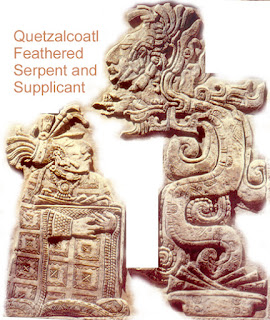
feathered serpent god and supplicant
I originally planned to make the serpent god, a really stupendously magnificent being, the first thing you see as you come up the walk to the house. I even had it all graphed out and ready to transfer.  But after a few months of thought (you shouldn’t rush such things) a benign realistic jaguar began to manifest itself, because really, the jaguars have a wonderfully strong presence here, they, and the other wildlife, are some of the main reason I chose to live here. I wanted to honor that. 

Ready to begin muraling, I took photos of my house walls (not so easy on a round house!).  I joined them together in Photoshop and created a flat view to use as a template with correct proportions (I could have just sketched out the plan, but I was having fun in Photoshop).
this plan is called a "cartoon" by muralists
On the house, I measured and recorded every wall space, the distance between windows, and the distance from the floor to what would be the bottom of every image. Then, in Photoshop, I superimposed a transparent grid sheet over the plan, sizing it so that each square represented one inch. Then I “pasted” a mural image into each spot onscreen.

my 8½x11" working cartoon
Now, with subject choices made, I created a fresh 8½” x 11” .jpg file for each image and superimposed a transparent grid on THAT so that every inch grid line on the house wall plan corresponded with the inch markings on my printed-out paper grid.

On the paper grid (my "cartoon"), I counted squares and wrote down measurements (in red on the ballplayer figure here) to correspond to measurements of the actual wall. That done I slipped the gridded diagram into a plastic sheet protector to keep it from getting wet or dirty – I didn’t want to have to re-count all those measurements.   

Time to transfer!  Using a #2 pencil, a yardstick, and a kneaded eraser, I measured the wall up from the floor and in from the window to find the outermost point of the ballplayer's toe (27” up and 4” in from the door frame – see the red arrow on the cartoon) and made a dot there.  Then I located a distinctive spot a few inches up, at the edge of his anklet (34” up and 7” in) and put a dot there.  I kept working, finding important points on the drawing, measuring VERY carefully.


the ballplayers feet, pencil outline
Finally, I had a dot-to-dot outline.  I went back and added some dots. Then checking back and forth frequently, I sketched the outline, erasing when I goofed, redrawing again, and re-checking measurements if something looked off. It is much easier to draw the outline with all the dots to aim for (I’ve enlarged the dots on the ballplayer grid so you can see them) than to try to do it freehand.

I didn’t put all the details in this pencil outline on the wall. I added those later when I was actually painting it.

the ballplayer, checking out my cleavage
At first, I thought I would color the figures, but after looking at the black outlines awhile, I realized that the simple black outlines looked elegant and that adding all the colors might make the mural too overpowering.

But it did need some color, so studying Mayan drawings online I found a motif called a skyband, a horizontal element which supposedly was used as a division between the natural and the supernatural worlds in Mayan mythology. It’s usually brightly colored in Mayan paintings, and I used it to connect all the murals into one continuous design.  

A short section of Mayan skyband
With the ballplayer outlined in black paint, I penciled in then painted a section of skyband in the colors that seemed typical to many Mayan paintings: teal green, cinnamon, a darker red-brown, light yellow, and yellow ochre (back to the paint store in San Ignacio!). Just for the record, the mural paint I’m using is Comex Vinimex, pintura vinil-acrilica premium, interiores/exteriores, satinado, which is pretty easy to translate: Interior/exterior vinyl-acrylic, satin finish house paint.

glyphs
Ix Chel, holding Moon Rabbit
Over a period of several months, I penciled in, then painted outlines for the rest of the figures, plus some fascinating glyphs like these at left (I’ve no idea what this one  means.  Maybe “Your grandma was a howler monkey!”?  Fortunately, few other people can read them either, so I’m probably safe.) I continued the skyband as I worked my way around the house toward the entry, completing Ix Chel, the moon goddess holding the moon rabbit (did you know many people don’t see a Man In The Moon? They see a Rabbit!). 

Then I added that whimsical jaguar with a lotus on its head (jaguars often swim, coming up draped with pond -- or lotus -- weeds). 
Lady Wac-chanil-ahau


jaguar figure
Lady Wac-chanil-ahau with her basket of offerings (but without her doomed captive!) came next. 

One other thing happened before the mural was done. When I’d finished with the Mayan parts, I saw that I was having a problem with the natural red clay wall surface crumbling off, sand-grain by sand-grain. 

I realized that my murals were destined for a short life unless I took measures.  So I painted cream-colored house paint carefully around each figure while Freddy, who has been working at my house to pay off the price of items brought to him from the US, painted the rest of the house. 
house-painting in progress

That stabilized the walls around the figures, and I then varnished the figures themselves to glue all their little sand grains to the wall.

Only then did I paint the jaguar on the cream-colored wall, using the same grid and dot technique. Jaguar spots were applied free-hand. Here’s my feline friend, the life-size jaguar in full color, who now greets visitors with his inquisitive and riveting gaze. I still need to paint the rock he is perched on. The skyband will continue around the rock to be covered by his front paws. 


The jaguar is a powerful god in Mayan mythology, so to my mind, he guards the entrance and graciously protects all within.

SO!  Now to show you the whole series, finished (including the guardian jaguar above) in the order in which they appear from the front door to the entrance,  where the guardian jaguar dwells:


So there you have it -- "How I Painted My House Murals." 
That’s my story, and I’m stickin’ to it
Hasta mas tarde - until later!


Sunday, June 1, 2014

A Short Foray Into Brazil

In Petropolis with Johann and Alessandra
My journey to Brazil in December of 2013 was sort of accidental.  I'd been having coffee with my friends Johann and Alessandra when they passed through my little hometown of Talent, Oregon, when they mentioned that they were planning to go home to Brazil, in the mountains just north of Rio de Janeiro, for Christmas.  

Wearing funny hats, Christmas Eve
I think I said something wistful like "well, if you decide you want company for Christmas, I'd love to come...," and forgot all about it until Alessandra's email arrived inviting me to do that very thing!    
A magical tree fern, 15' tall
So there I was, a few days before Christmas, welcomed into a lovely Brazilian family celebration, in a truly exotic and fascinating country I'd always wanted to visit!

Does this look ominous to you?
a gorgeous butterfly laying eggs
Of course, I had taken my sketchbook, so all of my time not spent in family doings was dedicated to wandering up and down the lane flanked on either side by dense jungle-ish vegetation, filled with marvels like tree ferns, peculiar plants resembling venus flytraps (but with no moving parts), gorgeous butterflies—one I photographed was laying eggs, ferns that resembled octopi (or octopuses, if you prefer), and any number of other wonders. My mouth hung open in amazement a good deal of the time. 
 
Since it was still the rainy season in Brazil, I also spent some time on the veranda with my sketchbook (and in a hammock, I admit), trying to do justice to the marvels all around me with drawings and paintings in my sketchbook.   
The ultimate "picture window!"
As in other tropical countries I've visited, the house was open to the outdoors, and much of the family's time is spent in an open room next to the kitchen, sort of a combination veranda and lanai opening onto a little walled garden. It's one of the most "scenic" window views I've ever encountered.

Even when it was raining, this "wallpaper" was enchanting.  I just loved sitting there watching the birds who came to eat bits of fruit scraps the family put out for them. 
I love to sketch in a hammock
Sometimes I even disciplined myself to draw. Frequently on my forays up the lane, I was dodging raindrops or scrunched under densely-leafed trees waiting for the weather to clear and trying to protect the sketchbook page as I drew.  That's not really conducive to finishing a sketch in any detail!
Fortunately, I've discovered that drawing in a hammock can be very comfortable provided I can find a pillow or two to prop myself up in a relatively erect position. I got some nice sketches from that hammock.
Rainy afternoon sketching session.
 Unfortunately, my sketchbook for that marvelous interlude is buried in storage, so I can't share my drawings/paintings of this fantastic trip—but more about THAT later!  
(Actually, I really should have posted this entry before I posted the previous Belize one, since it happened before. But that didn't happen, so you're stuck with this out-of-sequence tale.)

Meet Mr. Toad!
A giant toad came to visit numerous times while I was there, often after dark. I took photos of it, hoping to sketch from the view finder, which I find an invaluable tool. In fact, I've made it a habit to always photograph things as I'm sketching so that I can add details or color later when I am in more comfortable sketching/painting circumstances. 
A "vegetarian" octopus...fern, that is!

So, while I haven't yet actually sketched the toad, I can, one of these days when I have some spare time, sit down with my sketchbook and camera (or maybe I'll actually print out my photo) and add that marvelous 6" toad to my sketchbook.

An ornate cathedral in Petropolis
Alessandra, Johann and I spent most of one day in the nearby historic town of Petropolis, the former Summer Palace of the second Brazilian emperor, with its fascinating buildings and places to marvel over. I'm not a connoisseur of historical buildings, but I found Petropolis charming and quite interesting. 
Marmoset feeding on sap.
Of course, with my natural history leanings, I thought the little marmosets roaming the grounds of the Imperial Palace were fully as interesting as the more human-oriented structures for which the town is famous. 

Cashew fruits au naturel
I think the family was amused at some of the things I found fascinating, since to them, they're everyday items. For instance, I was intrigued by the cashew fruits sold in the supermarket in little styrofoam packages covered with a clear film, exactly the way tomatoes are marketed in Oregon. 
View from Johann's balcony
With cashews, you have a choice—eat the sweet fruit you see here and trash the nut, or forego eating the fruit, leave it on the tree, and let the nut ripen. The fruit is pretty tasty, actually.  There's a great article about the cashew fruit/nut here.

I also thought the mountains were astonishing. Many of them rise like perfect volcanoes (although they're not), and the sides of many are solid, nearly vertical, basalt (I think), with bromeliads growing out of them like hairy moles. 
Bromeliads dot these near vertical slopes.
I was never able to examine them close up (we only drove past these monoliths in the car) but I'd love to spend some time exploring these steep mountainsides!
This is a MUSHROOM?
During my stay, Alessandra and I encountered this brilliant red mushroom which we mistook for a piece of plastic rubbish at first.  I mean...it's so outlandish! 

The day after Christmas, it was time for me to leave, as NOW I was headed for Belize to scope out the possibilities of buying some land in the lovely Better In Belize Eco-community I had been exploring online.  But before I leave this post, I want to show you some of the more interesting/beautiful things I encountered in those Brazilian mountains just before Christmas.

 
A lovely cream-colored, sculptured 8" wasp nest

I needed a good plant ID book, but never found one. What is this?
AHA! My brother David sez it's  Hamelia patens
Common names: Firebush, Mexican firebush, firecracker shrub, scarlet bush

This 3" caterpillar must morph into a LARGE butterfly or moth.

An inch long, this is the biggest leaf hopper I've ever seen!

There were lots of cecropia trees all around the house and mountains.

Even the lichens on the trees were beautiful.
My flight, leaving from Rio, would dog-leg me through Newark, New Jersey before depositing me in Belize City some thirty hours later, so it was a marathon event—but very much worth my time since it catapulted me into the next frame of my odyssey.  (okay, now go back and re-read the post before this one ;o}.


Thursday, October 24, 2013

New Project!

Hey, authors get do-overs!  I never thought about it that way, but when a book needs a new look, new information, new status, we get to redo it!  Of course, there's a LOT of work involved, but the end result is that we get to erase the wrinkles, firm up the sagging body parts, and try a new hairdo on the book. Quite a perk.

Here's my perennial favorite book, Illustrating Nature, Right-brain Art in a Left-brain World, which is a do-it-yourself guide for the aspiring illustrator, starting from zero if that's where you are, and taking you as high as you want to go ~ ahem... well, it depends on whether or not you stick with it.  

When I taught my Biological Illustration course from it a few years ago, using the handouts that became the basis for the book, the class enabled I-can't-draw-a-straight-line-but-I-need-the-credit students to get their Project B artwork published in nature periodicals after just one term of study.  But once a you publish a book and it goes out into the world, you (the author/illustrator) seldom get any feedback from folks who buy it.  Sighhhhh......

But I got lucky!    

One of my students from long ago, Pete Schroeder, went on to teach Biological Illustration  at Southern Oregon University, the very course I had once taught. Although he was my student back then, he started out at a pretty high level of artistic expertise, and I just helped him polish his skills. His artwork is stunning, and he's also an excellent teacher. When I moved on to teaching sketching and journaling workshops out in the wide world, he took over the course using Illustrating Nature, and has been turning out some really good artists for several years now. 

On the left is an ink drawing, which was then computer-tweaked to resemble a pencil drawing (right).
Problem is, the book has sections that have become a little dated as the technology whizzes along at breakneck speed, and although most of it is fine, some parts, like the ones discussing computer tweaking illustrations and career opportunities, need some work. 

Pete generously offered to meet with me and give me feedback on what could use some changes, and after an intense session involving every aspect (including the possibility of making it into an eTextbook) I came away with a some good ideas on how to improve on it.  I'm already well into Chapter 3.  I'll get together with him again later to see if I'm on the right track.  

So, the Redwood and Beach sketch journal I began in early September has settled into its spot by the couch, waiting for me to find spare moments to add color to the drawings, but it's going to be awhile before I get moving on it.  

The thought of putting Illustrating Nature into e-book form is a little daunting, I have to admit.  When I upload my sketch journals for people to download and enjoy, I just create them as I would create a book, make them into PDFs and upload them.  But eBooks are done in code and have links, and you can't format them because everyone has a different kind of reader ~ from full size computer to cellphone ~ and if you've seen Illustrating Nature, you know that I format the heck out of it.  

In an eBook, every illustration marches down the middle of the page, one by one.  Like this:

As far as I know, you can't even put two illustrations side by side.  So that means that if I want two illustrations side by side, I'll have to join the illustrations into one graphic in Photoshop before inserting them into the text. I did that just now with the little wood ducks above, because they were originally two separate images. It's not a HUGE amount of work, but the book has hundreds of images, so it would be a lengthy process.  I can see I'd have my work cut out for me.  I still haven't definitely decided to do the eTextbook, but there's a good possibility. 


So.  There's where my life is at the present.  (Ha!  A big turkey hen just landed on my roof with a major THUMP.  It's getting dark, and she's probably about to fly up into a tree to roost for the night. Now THAT's an amazing sight I've only seen a few times. They look so amazing, huge lumps up in the trees.)  

Here's an illustration from one of my sketch journals a couple of years ago of a hen turkey doing just that. She's all fluffed up around her perch to keep warm.

Glad you came by.  If you've been using Illustrating Nature, I hope you'll comment with anything you'd like me to add or change.  Here's your chance!  

Here's a grab-bag of other entries...

Related Posts with Thumbnails