To join me on a virtual sketching trip, download a travel sketch-journal here.
I add tutorials to them so you can learn the techniques and details you see in the sketchbooks.

My former workshop students asked me to upload my workshop workbooks to make them available to everyone. So you can also download a workbook and give yourself a workshop! Enjoy!


Tuesday, August 7, 2018

My Mastectomy and Other Amazing Things

I Have Gone Flat. This is the word used to describe someone who has a bilateral mastectomy and elects to not have reconstructive surgery.  
My new flat look! I love it!


At Dan's cabin
I have successfully navigated the months of May, June, July, and August since my last blog entry, and I wanted to get in touch and bring you up to date with all the amazing things that have befallen me.  
Cousin Shelly and I at Mt. Ashland
I admit to having had a remarkably good time, given the circumstances for my trip to the US this spring (the mastectomy) having gotten a chance to catch up with old friends and neighbors during visits to their houses and during potlucks at Diana’s. 

Diana, by the way, was my "cancer doula," providing lodging and taking care of me throughout this potentially traumatic experience, and making it, instead, an amazing and transforming adventure. 
My cancer doula, Diana

Other cool things happened, too. My cousin Shelly, who was traversing the Pacific Crest Trail, interrupted her journey to stop by Callahan's restaurant at Mt. Ashland for a cozy lunch with Diana and me. 

Daniel, my long-time friend and companion, generously provided a little car for me to use, which made life easier as I worked my way through all the appointments, meetings, and other things related to major surgery.  
Lunch with Libby (above) and
Anna (below). 
Friends creating Celtic Jam
There were lunches and dinners with friends, a visit to Daniel’s delightful mountain cabin on his 4-wheeler, an afternoon and evening of Celtic music, sewing with Diana in her workshop, as well as a cloth dyeing workshop and shopping for fabrics, a visit to the beautiful Jackson County Extension demonstration gardens, an estate sale, John’s art show in Medford, and taking delivery of shoes, shoes, shoes (well, only 6 pairs, but it’s a great start!) for teens to wear for gym class here in Benque. If kids can’t afford gym shoes, they sometimes drop out of school because they can’t go barefoot or wear street shoes in the gym.  Several people were able to find extra walking/hiking shoes in their closets, and we took them with us to Idaho to pack up and send to Belize.
Around the first of June, a couple of weeks after my mastectomy (which was on May 18, commemorating the eruption of Mt. St. Helens, which, if you look at it in a certain way, was similarly the occasion of the removal of a conical lump) I traveled by car with Diana and John from Oregon to David and Marcia’s place in Eagle Idaho, near Boise.  
David plays his Diddly Bo
After depositing me there and staying the night, Diana and John went on to a family reunion in Nebraska, while I stayed to enjoy the company of my sibs, including David and Marcia, my sister Elsie, who lives nearby, and other assorted relatives.  
While there, I rested a lot, drank beer and talked philosophy with David, played with the gorgeous “diddly bo” he had constructed, and we worked together several evenings to install all the programs I needed into the computer Daniel gave me while I was in Oregon.  My old computer here in Belize was starting to sputter and stall, but with the new computer I can return to working on my sketchbook journal compilations, and other projects. 
Marcia painting dragonflies
on a silk scarf
Marcia and I some lovely long chats, too, and I got to watch her producing one of her amazing painted silk scarves. 


My final task of the six-week trip was to pack the donated shoes (freshly laundered!) and items I couldn’t get into my luggage into three big poly tubs to ship to Belize.  David took them to the PO to mail to Texas, where they went on a container ship to Belize, then by truck to a nearby town here where I picked them up, finally, just last week.
Some of the donated shoes.
I recovered from the operation amazingly well and fast (my doctor was impressed), including the expected retention of fluids once the drains were removed. The fluid was drawn by the surgeon once in Oregon and once again by another surgeon in Boise (a simple office call each time).  And that was the last time I saw a doctor.  I feel great.
my tubs arrived
You can almost see the house
My flight home was on June 12, a little less than two months ago, and at this point, ten weeks after surgery, I feel close to completely healed.  I’m doing all the things I normally would do, lifting coke cases with (empty) bottles into the pickup, hanging out the wash, putting things onto top shelves, sweeping the floor, doing minor landscaping tasks, and sleeping comfortably in all positions without pain or stiffness. My friends and family were wonderful to visit, but It is lovely to be home.
Me, post-op flat
A point of interest -- none of the doctors mentioned that the areas where Muriel and Janet (left and right breasts, respectively) had perched would be numb after the operation. If I’d thought about it, I might have guessed, but I didn’t. In fact, I didn’t really do much research at all on my condition before the operation. I decided that I would live one day at a time as well as possible, and not focus on what was to come – and the best way to do that was to not know too much about it. That approach served me well, keeping me upbeat and disgustingly cheerful throughout the whole thing. The numbness is just a cosmetic effect, and while it feels a bit peculiar, it has no bearing on how well or how healthy I feel. 
Full-moon dinner cruise with neighbors
on Laz's pontoon boat.  $10 each.
While I was in the US, my young friend José kept my house safe, and I returned to a clean, orderly, sweet-smelling home, compliments of Millie, who came in the day before I arrived to spiff things up to welcome me back.
Now I’m back to my usual tasks, providing cokes and chips for the construction crew; doing the footwork for our Belize Scholarships program for the local kiddies; joining in on community celebrations – most recently, a full-moon cruise on the lake with Laz on his pontoon boat; and tying up loose ends with the Lights for Students program. 
Laz pilots the pontoon boat
Thanks to so many of you who made donations to my Lights for Students gig, nearly all of the local families with kids now have lights at night, and the children are consequently able to do their homework after dark so that they don't fall behind the town kids in their studies.
sweet scholarship kids
So now I have turned my efforts to creating a Study Center in my spare room so the kids who come to use the internet after school will have a comfortable and warm place to study.  If the “warm” concept puzzles you, keep in mind that with the high humidity here, a week of cloudy, rainy weather can have us shivering in our boots sandals. I often loan kids jackets and sweaters to wear home after dark.
So to launch the Study Center, I’m now trying to get money together for a 6’ folding table (you know, those nice durable plastic ones), four chairs, and a printer.  My friend Jenny, who lives here at BIB, donated most of the cost for a computer for the kids, and we have that now, but a printer is essential.  

Freddy, my friend who is foreman on the construction crew, still owes me a couple of days work to pay off the cell phone I brought him from the US, so he’ll make me some shelves and help me wire the lights over the table.  
This katydid looks exactly like a leaf and twigs.
I think another $700 should do the trick, so if you are one of the people who asked me to tell you what is needed here, there ya go! Any amount is welcome, and any money left over (if we get extra) will be used to buy printer ink, paper, and school supplies! Jenny and I are headed to Spanish Lookout to buy the table and chairs next week, so if you're thinking of helping out, now is the time to do it. You can send donations via PayPal -- it's very easy. And hey, if a donation is not on your agenda, this paragraph wasn’t aimed at you. 😊
Moving right along.....The latest event in my MIcasa saga (my teeny jungle shack) was somewhere between hilarious and horrible.  After ten weeks of neglect, I finally made it to my little house in the big woods, only to be greeted by an ominous termite trail leading out of the forest, across the veranda, and under the front door.  
Termite wings everywhere!
Opening the door, I discovered that there had been a termite hatch inside, and the entire inside of the house was coated with discarded termite wings (termites ditch their wings after mating). Wings were on every surface and even clinging to all the walls. They are like tiny bits of cellophane, somewhat electrostatic, and elude clean-up efforts easily. But it wasn't only termites...

The entire interior space was swagged like a Halloween horror house with dusty gray spiderwebs, festooned from one end of the house to the other. My very first act was to get a long stick and wave it around in the air until it was swirled with webs and it was possible to walk cross the room without getting strands of silk stuck to my eyelids and lips.
Mouse nest under pot
Then I noticed a chewed towel, and jute twine trailing across the room, and discovered, under an upturned pot in the dish drainer (my final cleaning act of the previous visit) a well-stuffed mouse nest made of bits of towel and jute twine, and – oh NO! – heavy white string that could only have come from my hammock, which was hanging from a nail over by the door…..Aughhhhh!   
my mouse-chewed hammock
You can imagine how the next few hours were spent. Since the hammock is where I relax after doing scrubbing or carpentering tasks, mending the hammock was high on my to-do list. The mice had chewed off most of the support strings on both ends, and gnawed seven gaping holes in the body of the hammock.  Fortunately, I had a roll of nylon string used for carpentry jobs, and after only six hours of labor, my hammock was reassembled. 

Every string had to be tied off, and the end support strings had to be replaced, but by the time I was exhausted from cleaning and scrubbing and dusting (and mending!), I had a hammock to rest in again.  But like I said, it was really kind of humorous, with no major harm done (except to the hammock) and it makes a great story.  


Heliconia plant
However, I’ll try not to let ten weeks pass between visits again – the wildlife had every right to think I’d abandoned the place.
 Millie and I have been working on my landscaping here at Casa de la Tierra (yeah, yeah, I know, that sounds horribly pretentious, but in Spanish-speaking countries people name their houses). Right now it looks really pretty, with the wet season well begun and greenery flourishing. Here's one of my heliconia plants.
Crayola Katydid
And of course, there is the usual parade of amazing insects – I’d never seen one of these Crayola Katydids until José spotted this one on a tree just off the veranda, then went down and caught it for me to sketch (nope, haven’t sketched it yet, but I took lots of photos and I PLAN to sketch it).  
Wow! My very own
bananas!
And LO! my banana tree is producing fruit!  I asked Millie when to harvest the bunch (called “a hand of bananas”) and she said when all the leaves die, you chop off the hand of bananas with a machete, then chop the tree down (O horrors!). A new sprout at the base of the chopped-down tree will rise up to become a new tree in short order (well, okay).
All righty, enough blathering.  I hope you have enjoyed this little tour of recent happenings in my life.  But if you didn’t, why on earth did you read this far?!
Big hugs for you, my friend! 
Renie

Thursday, April 12, 2018

My new relationship with Ramón

I've entered into a new relationship. His name is Ramón. I really didn't mean for things to get this serious, but maybe the time has come, and well.....here's the backstory....

******************************************* 

R
ising 80-100’ into the canopy directly over my driveway, this year a large tree called the Mayan Breadnut or Maya Nut Tree, Brosimum alicastrum bore a LOT of fruit which plopped onto my truck and littered the ground until it got my attention   

The wildlife appear to relish the nuts, even when they’re green, peeling off and dropping the heavy rinds all over the place.  Occasionally a nut slips from their grasp and lands on my  roof, crashing like a firecracker -- think of a marble, crashing on the bottom of a tin bucket from 80-100' up. Yup, that's about right.  There is a Maya Nut Tree over my little Micasa, out in the jungle, too.

Here in the rainforest you never know what’s blooming or fruiting overhead until the trees drop their flowers or fruits, or some gluttonous forager loses a grip on its snack as it goes to pop it into its mouth. Possums,coatis, kinkajous, and other creatures chow down at night, and howler and spider monkeys, toucans, parrots, and other birds and mammals forage in the daytime, so you can often pick up “clues” about overhead tree identities on the ground after their feasts.

In early February I sketched a bunch of interesting seeds/fruits/nuts that had fallen from the canopy onto my walkway. The green fruit and shiny brown seeds on the right are the fruits from that tree, but at the time I didn't know what kind of fruits they were.

Now in early April, the fruits have ripened, and the green peels have matured to a bright orange.  They taste a lot like oranges, too. To make sure they were edible, I first asked Belizean friends what they were called, then found them in my (excellent) book Trees of Belize by Kate Harris, then went online to find out if they’d poison me if I nibbled on them. They won’t. 

And that was how I met and fell in love with...my Ramón Tree.  { HA!  Gotcha! Right?}  I also discovered something else so interesting I thought you might enjoy it, too.  

It seems that the leaves of the Ramón Tree, named after the Spanish word ramónear which means “to browse,” were a favorite choice for chicleros seeking food for their mules.  In case you don’t know, the chicleros were the hombres who went out into the forest in the early- to mid-1900s to harvest the latex from the chicle tree (Manilkara sp.for use in making chewing gum.  There are still some working chicleros.  I actually know a chiclero (but his name is Erec, not Ramón). 

Chicle has been used as a chewing gum for a l-o-o-o-ng time-- as Wikipedia notes: Maya traditionally chewed chicle… as a way to stave off hunger, freshen breath, and keep teeth clean.”  You've heard of Chiclets, right?  They're nearly pure chicle latex, sugar added.  

Okay, so the chicleros’ mules ate the Ramón leaves. Then, their appetites sated, they hauled the bags of chicle out of the jungle to be sold in the markets. I have a couple of chicle trees about a hundred feet up the hill from my Ramón Tree, crisscrossed with ancient chiclero slashes from which the latex dripped into the gathering bags.

What really snagged my attention, though, was reading that as the chicleros chopped branches from Ramón trees for the mules, they’d often discover that the trees were growing up from the tumbled stonework of Mayan ruins.

The archaeological record from Mayan sites shows that Ramón nuts were apparently a dietary staple to the ancient Mayans, who ate the fruit and also boiled or baked the dried and ground nuts, which have more protein than corn, as a major part of their diet. Ramón nuts are still eaten in Quintana Roo (in Mexico) as survival food. 

So, in a Ramón nutshell, it appears that the Ramón groves discovered by the chicleros may be descendants of old Mayan Ramón orchards. What makes it even more interesting, is that my Ramón Tree is within twenty feet of the edge of what is said to be an unexcavated Mayan site in Mayan Circle here in the ecovillage where I live. So maybe my Ramón tree’s long-ago ancestor was planted by a long-ago Mayan.

Anyway, here’s what the ripe Ramón fruits look like. If you come to visit me in in April and see a small orange fruit lying in the road (check the end of my driveway, just behind my pickup truck) stop and take a look.  It will probably be a Ramón fruit. As you can see, it looks like a tiny orange with a stem.  The seeds have a brassy appearance that's very distinctive.

If it's a Ramón fruit, give it a wash then nibble on the orange rind. It’s really tasty – citrusy and sweet. Yum! I didn’t try eating a green one earlier this year, because 1) I didn't know what it was then and I never taste unknown fruits, and 2) I'm guessing that the green rinds (like the ones in my sketch) would be horribly tart and inedible, and maybe taste like turpentine. 

I hope you'll forgive me (and Ramón) for trying to fool ya.  It was irresistible. 


Monday, February 12, 2018

Creating an Art Studio Where There’s No Room For One

How many times have you heard people comment that they’d love to practice their art if they just had a place to work. But even a tiny dedicated space which won’t be disturbed (much) for other reasons can make a fine work spot if you really want it to.

Many artists have fantastic studios -- huge, lots of storage and workspace, marvelous lighting, a place for everything.  I had a pretty nice one myself not so long ago. But when I built my earthbag house in the jungle in Belize, an art studio didn’t seem important – my whole house could be my studio, I thought. '

But when I started “being an artist again” last November, I began yearning for a specific place to leave projects out, where they wouldn’t be in the way.

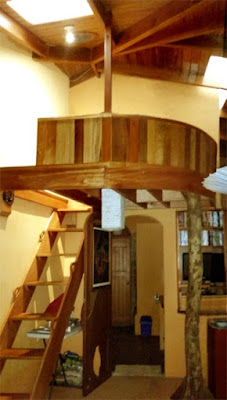
The only place I could find to set up even a tiny space permanently was my loft, and it was already in use storing empty suitcases, Christmas ornaments, off-season clothes, and similar odds and ends.  But it would have to do, so I set to work.

MAKING ROOM:  The first problem is that it’s L.I.T.T.L.E.  One wall is 7’ long, the other is 5’, and the remaining wall, 18” high, curves out over the living room leaving a floor space looking like one fourth of an elongated pie.  A 22” wide staircase eats up nearly two feet of floor space along the 5’ wall.  Like I said, little.

But, ever hopeful, I started shifting things around. Since I didn’t want to see my junk poking up above the 18” wall from the living room below, I couldn’t just pile things up to the ceiling.  But by stuffing all the Christmas ornaments into an empty suitcase and consolidating some other boxes, I was able to open up a space about 3’x4’.

SEATING:  On the veranda I had a canvas camp chair that was threatening to rip and/or collapse if someone large or squirmy were to sit down hard in it. With care, I can get a few months more life out of it, and it’s very comfortable – a lot better than a stump, a rock, or the cross-legged pose I assume while out sketching in nature.  It fits perfectly into the cleared space. We're on our way.

WORKSPACE: a flattened cardboard box makes a sturdy table top over a poly tub holding off-season clothes. Some 1/8” thick wall paneling cut into lapboards and table tops makes sturdy surfaces to draw or set things on. One 12”x18” piece of paneling makes a good lap board to work on – it’s lightweight, maneuverable, and fits within the arms of the chair.

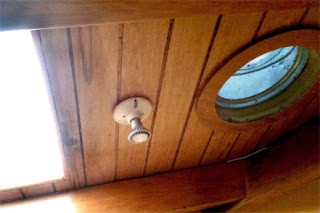
LIGHTING:  a translucent skylight directly above offers perfect diffused light in the daytime, and while I haven't used the studio yet on a hot day, there is a screened roof vent near the skylight so heat should go right up and out – but that remains to be seen.

At night, the spotlight that was formerly trained on my lion door (which is now under the loft) shines right onto the lap board on my lap. I may add a gooseneck lamp to shine on sketch subjects at night.

TOOLS & SUPPLIES:  My art supplies are in a tiered artist’s toolbox which remains open and serves as storage and shelves for watercolor pencils, ballpoint pens, water brush, rag, water can, scissors, and a few other things I use for sketch/journaling.

SOUND SYSTEM: a 3”x 3” Bluetooth speaker picks up a signal from the wifi below to play music I select from the internet, a splendid bit of hedonism to my mind.

It looks more or less like this, drawn on a 1” grid so each little box is 1 square foot. The black outlines are the junk, under all little table top boards and the art box.  I’d estimate the whole loft is about 25 square feet, while actual bare floor space is about 12 square feet.  I may put up some shelves at some point, which would expand the space considerably.

Someday I may find another place for the junk, but until then, this works fine.  I know, because I sketch/journaled the tapir bone page there last week.  I’ll detail that in the next blog entry.

 It has some good points, for sure. No one is going to be casually walking through, I can duck and hide if I don’t want company, and I can’t possibly complain that it is too big to keep tidy.  But best of all, I've been using it, and my only complaint is that I can't get to the door downstairs very quickly when company comes.  I'd say that's a pretty minor complaint.

So if you've been thinking you don't have enough space to set up your studio, I hope this has given you some inspiration.

And just in case you are telling yourself "Well, pooh on you, I don't even have THAT much space!" take a look at the "desk" where I did about half the illustrations for my first book, America's Horses & Ponies, when I had only a bed to sit on.  At night, I'd hoist it up to the ceiling so I could sleep underneath it.  In the sketch below, I show it both lowered and raised. Where there's a will, there's usually a way.....

.

Saturday, February 3, 2018

Raising a Jaguar

As promised post before last, here's the pictorial history of the making of the jaguar mural. It took me from April to December, start to finish.

As the final image to complete the set, I had planned to do a really stunning Mayan depiction of the Serpent God, which would welcome visitors to my house.
But after much thought, I decided that I wanted to welcome people with something of my own, something that spoke to why I am here in Belize -- to live in the tropical world with its amazing flora and fauna -- and while a Mayan representation would be really cool, it would be something Mayan which I duplicated on the wall.  

Instead, I wanted the welcoming image to warmly greet people on my behalf, so I finally settled on a life-size realistic rendering of a jaguar, a potent figure in Belize life.


 I went online and found a photo of a jaguar which looked kindly, welcoming but also protective, and graphed it as I had graphed the Mayan figures. Soon had a handsome jaguar penciled onto the wall (for more about that process, go here.) 
this is the photo

All of the previous Mayan figures had been painted with vinyl outdoor paint on the cinnamon-colored natural clay walls of the house, but I’d discovered that the walls needed to be stabilized lest the paintings flake off within a few years. So I had painted (or rather, Freddy, my Sunday worker and I had painted) the house a lovely cream color, working carefully around the Mayan paintings
then varnishing the figures themselves.  all of the Mayan figures were finished, but since I hadn't yet begun the jaguar, I had Freddy paint over the large area where it would be before I drew it, stabilizing the wall and giving me a lovely, solid soft cream base for the painting.

The sky band, the colorful Mayan ribbon that connects all the figures, had two colors, cinnamon and ochre, which combined with the cream house paint could recreate the basic coat colors of the jaguar. 

So using the house paint as a base, I mixed in cinnamon and ochre and began applying color to my pencil outlined jaguar image.  To my astonishment painting the jaguar the base color without any spots produced what appeared to be a North American cougar.


Spots really do mess around with perceptions.

The jaguar’s eyes came next.  I always finish the eyes first thing so that whatever I am drawing will come to life as soon as possible.  Jaguars, like  house cats, have variable eye coloring, anywhere from golden yellow to jade green.  I used the green from the skyband to give my jaguar a penetrating gaze.

 Adding the black rims to the ears reduced the cougar similarity, as cougar ears don’t have black rims. As soon as the tawny undercoat had dried I penciled in jaguar rosettes.

Every jaguar has its own spot pattern, plus rosettes on their sides -- small spots encircled by a ring of spots, so I didn’t worry too much about making my spots exactly the same as those on the photo. In fact, I changed things around to make it distinctly my own, while still being true to typical jaguar markings.  Soon the jaguar itself looked calmly down from the wall.
 
At first, it was one-dimensional, as I didn’t do any shadows or shading on it.  I let it rest for a while, watching it as I would leave and enter the house over the next few weeks, trying to decide whether to leave it flat or give it a 3-D effect, and finally I concluded that I couldn’t stop half-way. 


Using a dry-brush technique – which simply means dipping the brush in paint then scrubbing much of it away until when you apply it to the surface it doesn’t leave a solid swath but more of a misty shadow effect – I shaded the body until it finally looked about ready to come down off the wall to check out visitors. 
Then I added the jaguar’s bristly white whiskers. 

I finished the sky band that connected the jaguar to the rest of the house’s Mayan images, curving it around under the jaguar’s paws as though it were on a curved surface to lend depth to the mural.

I didn't get around to painting the rock the Jaguar was presumably perched upon until just before Christmas, also adding a jaguar glyph I had sketched at the Gran Jaguar temple at the Tikal archaeological site in Guatemala in 2016.


I figure it took me about forty hours from start to finish.

The jaguar is approximately life size, and I feel he is a gentle guardian, checking out visitors to make sure they have good intent before letting them pass. I have discovered, though that he can apparently make himself invisible.  When people come to visit, I usually greet them at the edge of the walkway, welcoming them and inviting them in.  With their eyes on me, they pass so close that he could reach out and pat them as they enter, were he so inclined. If they DO see him, they always stop to admire him, so I know whether or not he is wearing his invisible cloak. 

Being a bit of a mischief maker, I ask ones who didn’t stop if they saw the jaguar on their way in.   Guests who had their eyes focused on me instead of the big cat look at me in puzzlement, so we return to the entrance, and they are amazed to see the VERY visible and imposing jaguar gazing down at them.  It’s a kind of magic.


The murals are finished now, although the Belizean kids who use the veranda for a study hall have been urging me to paint a jungle behind the jaguar.  I have to admit, it would create an amazing entrance, but it would be a huge task and I think I’ll rest on my laurels.

I have some other things on my platter, such as working in my sketch/journal; adding amenities to Micasa, my little retreat in the jungle; and lighting up neighborhood houses.  This last project is being very rewarding and maybe in my next post I will show you what I’ve been up to.  You’ll be particularly interested if you helped me out with the project when I was in Oregon last summer. 

Until next time… 

Monday, January 22, 2018

The Birth of a Graphic Image

TaDA!  Behold, the Turnip-tailed Gecko! 
(click image to enlarge)
If you've ever wondered about the process of getting artwork ready for reproduction online or in a book, read the rest of this blog entry.  If you haven't, well, co ahead if you don't have anything better to do.  Just sayin'.....

For people who aren’t practicing artists or designers, or are not comfortable messing around with graphics programs, scanning or photographing their art is the final step before posting it to the blog.  They post it as-is.

A scanner usually gives better results, but if a scanner isn’t available, it is possible to make do with a photograph. But unless lighting conditions are excellent, a photograph may not produce a very good image, and it may not be true to the original by a long measure.
The process that happens to photos or art between the production by the artist and the publication online or in a book can be compared to what happens to a musical performance before it is released to the public. The original performance is given, then an audio engineer mixes results from several microphones, adjusts the volume, bass and treble, speeds it up or slows it down, dubs in instruments or vocals, adds various effects and generally changes the overall sound of the music before it is released to the public. And oh yes, often the original music was electronically produced, not performed with traditional instruments.  The public praises the composer, artist/s and conductor, but the contribution and skill of the audio engineer goes unnoticed.  Alas, such is life.
What happens to art is similar to the audio-mixing process noted above. A lot of things can be done to make the captured image truer to the original art, and sometime things are done to make it better or different.  When I post art or photos, I usually at least improve the color/lighting.  Look what a difference just raising the light level in a graphics program can make in a photo:


Here in my kitchen, I was trying out a recipe for avocado toast on my comal (ko-MALL), a flat slab of aluminum or steel commonly used here in Belize for toasting, heating, and frying.  With the aid of the graphics program, I made the sun shine outside and turned on the light in the kitchen so you can see everything and sense the warmth of the room.  

So if my scanner is not working and I photograph one of my sketches, it can look pretty bad at first, like the first image of the gecko here, and I have to do a LOT of things to make it finally look the way the sketch actually appears in my sketchpad.  It may take me an hour or two of adjustments to reach a point where I am satisfied that I can’t improve it further. 


Here are the steps, in the order that I do them:
  • rotate the image until it is level
  • crop and remove the coil because it would take a lot of work to make this one look good. I'll replace it later.
  • lighten the entire image globally
  • cut and remove most of the darkest garbage 
  • resize – if I am making a series, the pages all need to be the same size.
Now it looks like this:


Keeping an eye on the colors to make sure I don’t lose anything, I:
  • apply a Gaussian blur filter to the entire page with a radius of .5 pixels. This smooths out lines and softens the look slightly. This is important because some pixels disappear from light areas during adjustments, creating rough edges, but with the slight blur, any additional changes will work better.
  • hand darken (burn) and lighten (dodge) various areas to make the image even-toned
  • globally adjust the contrast levels of everything – the highlights, the midtones, and the shadows for the entire image, then hand dodge or burn areas that need more individual change
  • select all the text with the lasso tool and desaturate it to remove any color, then increase the shadow and midtone levels until the text is strong and black
  • hand dodge for highlights and burn to strengthen shadows and color tones  again until all the paper is white, all the text is evenly dark, and I haven’t lost anything important from the colors of the image
  • paste on a cleaned-up version of the sketchbook coil. I paste this same coil image on each of my sketchbook pages since they are a set.
 Now it looks like this:
The paper and text look pretty good, but the drawings aren't right yet, so I warm up, cool down, and slightly shift the color of the entire image. Then I make  final improvements and corrections to the original. 
I decide to:

  • select everything and reduce the size of the sketch to fit on the page better.
  • move the gecko’s foot and text in the lower left corner higher up on the page for better balance
  • put highlights in the eyes
  • clone markings on the gecko’s top side to closer resemble the original colors
  • continue to adjust color lighter and darker, more and less constrasty, adding cloned color markings where needed
  • remove speckles, erase some extra lines, shorten a front toe, correct text, and replace or improve some letters which were poorly executed.
  • add a 2-pixel stroke around the sketch page to outline it.
and I’m done.  If you compare the last two images below, you’ll see where I’ve

edited and improved the original to make it more accurate, tidier, or create a better design.  Like the orchestral recording, things have been changed and improved. In this case, it’s my own personal effort that changed my own personal art, and I’m glad I didn’t have to ask a technician to do it!  Here's the previous step next to the final one so you can compare.

Everything I’ve changed is something I would have done on the original if:  a) I could erase the ballpoint pen ink I use in this moist climate, b) I got everything perfect the first time around. 

Since I'm the technician (YAYYY!) I get a do-over. Can you find the toe I shortened?  Also notice my notes say the gecko had only four toes on the rear feet, but I later realized there were five. Highlights on the eyes make them look a whole lot livelier.

A scan is usually more accurate than a photo in producing the image, so it won’t be necessary to do so much tweaking to a scan to bring the paper up to white without also losing the color and shading in the drawing. But no matter how you upload the art, there are always things that need to be adjusted to accurately represent the original.

Fortunately, I think all this twiddling is fun.  Go figure.

Here's a grab-bag of other entries...

Related Posts with Thumbnails