There's never enough time! I've been struggling with this problem with every workshop ~ I have so much I want to teach/share, and so little time to do it in.
During all this last autumn's workshops I tinkered lavishly to find the right balance of time vs. content, guaranteed success vs. challenge, plus adjusting other details ~ all while giving the students results they expected and hoped for. The student evaluations at the end of the classes really helped me figure this out (and the students who won the evaluation raffles appreciated the autographed book prizes ;^)
This fall, I had split the Nature Sketching classes into Beginning (Nature Sketching Basics) and Intermediate (Nature Sketching Details) workshops, which gave the students time to concentrate and complete more projects. Starting in January, I will have further split off the watercolor pencil painting section into its own two-day class, in order to allow the students more time to hone their skills and experiment with the medium.
I will also split the Nature Journaling workshop into two 1-day workshops so that people interested only in nature writing OR in nature journaling could come to whichever class appeals to them. The workshops will be held back-to-back on a weekend, so it's easy enough to take them together, as before.
Obviously, this December I am going to be busy working out more exercises for some of the classes, because when I split them up there was necessarily some repetition of the exercises to bring each class up to speed. The students would prefer a fresh exercise instead of repeating a previous one. In terms of learning, it's probably more useful to repeat an excercise several times, but when you pay for a workshop you expect to get all-new revelations, so I'll work to make sure there are no repeats. I really DO listen to my students!
So that's the update on the behind-the-scenes workshop planning.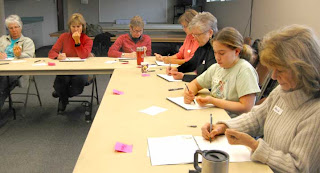 Here's what my most recent batch of eager students went through.
DAY 1
This was my intermediate nature drawing workshop, so I was quite pleased to see some returning Basic students appear Saturday morning, along with new students. And I had all ages, from a very mature twelve to somewhere in the late 60s or 70s. Great people.
The format of this class was to spend the first day on pencil rendering, including ways to get the drawing accurate, shading for three-dimensional effect, and learning special techniques for special situations (realistic eyes, hair direction, and rendering symmetry in such things as seashells and leaves, etc.). Here's the class, warming up with the draw-your-hand exercise before launching into the details.
Notice the way the classroom is set up in an L shape ~ I like to coach from in front of the student if possible. This keeps me from jostling the student (and the adjacent student) because I can come in from the top of their drawing instead of beside, although sometimes I need to go around behind to see the subject from the student's perspective.
When I have more students, I add another table to make a U, which still gives me the inner work area. This is especially nice because no one has their back to me, and students can see the demos better.
For this class I now tried out a new project, and the results were thrilling both to the students and to me. Students who had time, took their project home to perfect, but most of these were finished in the class.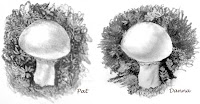
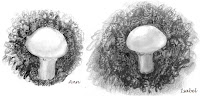

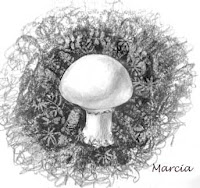
Be sure to click on these to look at them close-up, because we did some really tricky stuff with them.
DAY 2
On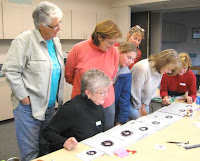 the second day, after admiring and critiquing the mushrooms they'd brought back to class, we concentrated on color, trying pencil, ballpoint, and micron
  pen drawings combined with various watercolor pencil color wheel combinations to get brown. Then they drew bones and experimented with various ways to use color as shading on the (relatively) white bones.
I encouraged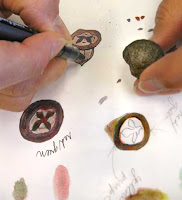 them to use unconventional colors for effect, since anything white bounces back colors that surround it, and their results were fascinating. Here's a pony tooth rendered in green and blue, and a beaver jawbone rendered in ochre and purple, and they both came out excellent and very natural-looking (as did the bones by
 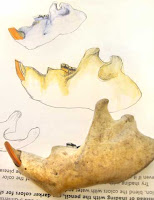 other students).
The next project was my standby orchid ~ this is a useful model for teaching brush techniques for edges, because it emphasizes how to get precise clean edges and also how to get soft, blurred edges which blend off to nothing. It always amazes (and pleases) me how every orchid ends up different, even though each student hears and responds to exactly the same instructions.
Now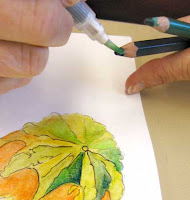
 they had MOSTof the skills they needed to tackle the day's final project, to draw and paint some gourds I'd found in the local farmer's market. There was one remaining technique I showed them about removing color from the pencil tip with the brush to apply to their picture. You can get a nice, intense color this way, and apply it more precisely then you could with the pencil.
I have to say here that my students are really gracious about my taking pictures. I urge them to just keep working as I come by to snap photos (I do turn the flash off for the least intrusion). For the two photos showing how to remove color from the pencil,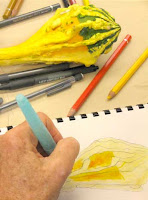 though, Randye slowed down a little so I could get the pictures.
One technique we used for these gourds was an under-wash to help blend the color values. Varying shades of yellow seemed best for most of these gourds. You can see the wash at right. The students had a choice of doing the original drawing with pencil or ink. I was pleased when some of them chose ballpoint, because we had tried it out earlier in the day.
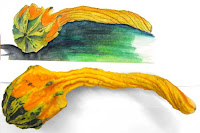
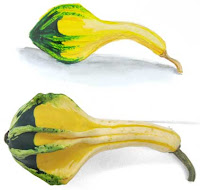
While drawing in ink would seem impossible for a beginning or even intermediate student, they discovered (as I had hoped)(and MOST counter-intuitively) that drawing in ink is sometimes easier and more freeing than drawing in pencil. Some students not only drew the original gourd in ink, but then went back after coloring it and put in details with a pen, with excellent results ~ particularly for a first-time effort. Here are their gourd paintings. Be sure to click on them to see them close up.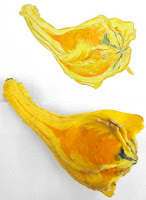
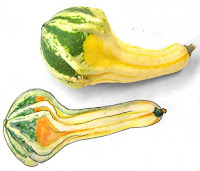
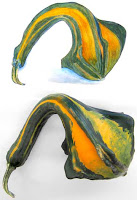
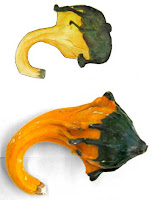
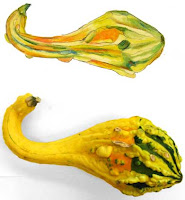
As I was saying in the beginning of this post, there never seems to be enough time to finish. These gourds, first time watercolor pencil renderings for (I think) all of these students, were completed (or not completed!) in about an hour and a half. Amazing, huh? While the students learned an immense amount, I think with less pressure and more time they would have been able to produce even more satisfying paintings, as well as learning a few more subtleties. I think the two-day watercolor pencil workshops from January onward will be a very pleasing improvement over this one-day experience with color.
During all this last autumn's workshops I tinkered lavishly to find the right balance of time vs. content, guaranteed success vs. challenge, plus adjusting other details ~ all while giving the students results they expected and hoped for. The student evaluations at the end of the classes really helped me figure this out (and the students who won the evaluation raffles appreciated the autographed book prizes ;^)
This fall, I had split the Nature Sketching classes into Beginning (Nature Sketching Basics) and Intermediate (Nature Sketching Details) workshops, which gave the students time to concentrate and complete more projects. Starting in January, I will have further split off the watercolor pencil painting section into its own two-day class, in order to allow the students more time to hone their skills and experiment with the medium.
I will also split the Nature Journaling workshop into two 1-day workshops so that people interested only in nature writing OR in nature journaling could come to whichever class appeals to them. The workshops will be held back-to-back on a weekend, so it's easy enough to take them together, as before.
Obviously, this December I am going to be busy working out more exercises for some of the classes, because when I split them up there was necessarily some repetition of the exercises to bring each class up to speed. The students would prefer a fresh exercise instead of repeating a previous one. In terms of learning, it's probably more useful to repeat an excercise several times, but when you pay for a workshop you expect to get all-new revelations, so I'll work to make sure there are no repeats. I really DO listen to my students!
So that's the update on the behind-the-scenes workshop planning.
 Here's what my most recent batch of eager students went through.
DAY 1
This was my intermediate nature drawing workshop, so I was quite pleased to see some returning Basic students appear Saturday morning, along with new students. And I had all ages, from a very mature twelve to somewhere in the late 60s or 70s. Great people.
The format of this class was to spend the first day on pencil rendering, including ways to get the drawing accurate, shading for three-dimensional effect, and learning special techniques for special situations (realistic eyes, hair direction, and rendering symmetry in such things as seashells and leaves, etc.). Here's the class, warming up with the draw-your-hand exercise before launching into the details.
Notice the way the classroom is set up in an L shape ~ I like to coach from in front of the student if possible. This keeps me from jostling the student (and the adjacent student) because I can come in from the top of their drawing instead of beside, although sometimes I need to go around behind to see the subject from the student's perspective.
When I have more students, I add another table to make a U, which still gives me the inner work area. This is especially nice because no one has their back to me, and students can see the demos better.
For this class I now tried out a new project, and the results were thrilling both to the students and to me. Students who had time, took their project home to perfect, but most of these were finished in the class.


Be sure to click on these to look at them close-up, because we did some really tricky stuff with them.
DAY 2
On
 the second day, after admiring and critiquing the mushrooms they'd brought back to class, we concentrated on color, trying pencil, ballpoint, and micron
  pen drawings combined with various watercolor pencil color wheel combinations to get brown. Then they drew bones and experimented with various ways to use color as shading on the (relatively) white bones.
I encouraged
 them to use unconventional colors for effect, since anything white bounces back colors that surround it, and their results were fascinating. Here's a pony tooth rendered in green and blue, and a beaver jawbone rendered in ochre and purple, and they both came out excellent and very natural-looking (as did the bones by
  other students).
The next project was my standby orchid ~ this is a useful model for teaching brush techniques for edges, because it emphasizes how to get precise clean edges and also how to get soft, blurred edges which blend off to nothing. It always amazes (and pleases) me how every orchid ends up different, even though each student hears and responds to exactly the same instructions.
Now

 they had MOSTof the skills they needed to tackle the day's final project, to draw and paint some gourds I'd found in the local farmer's market. There was one remaining technique I showed them about removing color from the pencil tip with the brush to apply to their picture. You can get a nice, intense color this way, and apply it more precisely then you could with the pencil.
I have to say here that my students are really gracious about my taking pictures. I urge them to just keep working as I come by to snap photos (I do turn the flash off for the least intrusion). For the two photos showing how to remove color from the pencil,
 though, Randye slowed down a little so I could get the pictures.
One technique we used for these gourds was an under-wash to help blend the color values. Varying shades of yellow seemed best for most of these gourds. You can see the wash at right. The students had a choice of doing the original drawing with pencil or ink. I was pleased when some of them chose ballpoint, because we had tried it out earlier in the day.
While drawing in ink would seem impossible for a beginning or even intermediate student, they discovered (as I had hoped)(and MOST counter-intuitively) that drawing in ink is sometimes easier and more freeing than drawing in pencil. Some students not only drew the original gourd in ink, but then went back after coloring it and put in details with a pen, with excellent results ~ particularly for a first-time effort. Here are their gourd paintings. Be sure to click on them to see them close up.
As I was saying in the beginning of this post, there never seems to be enough time to finish. These gourds, first time watercolor pencil renderings for (I think) all of these students, were completed (or not completed!) in about an hour and a half. Amazing, huh? While the students learned an immense amount, I think with less pressure and more time they would have been able to produce even more satisfying paintings, as well as learning a few more subtleties. I think the two-day watercolor pencil workshops from January onward will be a very pleasing improvement over this one-day experience with color.
No comments:
Post a Comment